A kitchen renovation is one of the biggest investments you’ll make in your home, and one of the easiest to get wrong. From blown budgets to layouts that look great on paper but fail in practice, the kitchen renovation mistakes to avoid are often the ones you don’t see coming until you’re mid-build and it’s too late to course-correct. For homeowners across Melbourne’s northern and western suburbs, where older homes often need thoughtful updates, getting it right the first time matters.
At Transformer Homes, we’ve guided countless Melbourne homeowners through kitchen remodels, and we’ve seen firsthand what happens when planning falls short. Poor ventilation choices, undersized benchtops, cheap cabinetry that doesn’t last, these aren’t rare horror stories. They’re common problems that come up project after project. The good news? Nearly all of them are preventable with the right knowledge before you pick up a hammer or sign a contract.
This guide covers 15 of the most frequent kitchen renovation mistakes we encounter, along with practical advice to help you sidestep each one. Whether you’re planning a full gut renovation or a targeted upgrade, this is the checklist you’ll want to read before anything else.
1. Picking a builder after you have locked in the design
Many homeowners treat the builder as the last piece of the puzzle, someone you bring in once the plans are drawn, the materials are selected, and the design is signed off. This sequence feels logical, but it’s actually one of the most costly kitchen renovation mistakes to avoid. When your builder has no input on the design, you end up with a kitchen drawn by people who won’t be held accountable for building it.
Why it happens
Most people start their renovation journey with inspiration, magazine tearouts, showroom visits, and saved photos. They find a kitchen designer or architect, get excited, and lock in a design before they’ve even thought about who will do the build. The design process feels creative and enjoyable, while finding a builder feels like a task you can handle later. The problem is that later often becomes too late, and by then you’re already committed to drawings that may not be buildable within your budget.
How to avoid it
Bring your builder into the conversation as early as possible, ideally before the design is finalised. A good builder will flag practical issues with a layout, point out where drawings don’t match what’s physically achievable, and give you a realistic cost picture before you’ve committed to anything. This matters especially in older Melbourne homes, where walls often hide load-bearing structures, asbestos sheeting, or plumbing that runs in awkward positions.
Getting your builder involved before you lock in the design saves you from paying to redraw plans, change materials, or reverse work that was never buildable in the first place.
Running your design past a builder early doesn’t mean losing creative control. It means your creative decisions stay grounded in reality, so you’re not redesigning on the fly once the build has already started and costs are climbing.
Specs and questions to ask your team
Before you sign off on any plans, sit down with your builder and work through these specifics:
- What is the structural condition of the walls you plan to move or remove?
- Are the proposed plumbing and electrical locations achievable without major relocation costs?
- What are the lead times on the materials and appliances included in the design?
- Does the design account for the existing ceiling height, floor levels, and window positions?
- Which design choices carry the highest risk of triggering unexpected cost variations once work begins?
2. Demolishing before you finalise plans and approvals
Starting demolition before your plans are approved and permits are secured is one of the most common kitchen renovation mistakes to avoid. Acting too early can stall the whole project, force costly rework, and in some cases attract attention from your local council.
Why it happens
The excitement of finally starting a long-overdue renovation pushes many homeowners to act before the paperwork catches up. Demo work feels productive, and waiting on councils or certifiers can stretch for weeks. Some people also assume that because they’re working inside their own home, permits aren’t required. In Victoria, that’s often not the case, particularly where plumbing, structural changes, or electrical work are involved.
How to avoid it
Treat approvals as part of the build timeline, not a separate box to tick after you’ve already started. Book your builder and certifier early so the approval stage runs in parallel with your design finalisation rather than after it. This keeps the project moving without forcing you to demo walls before anyone has confirmed what’s actually behind them.
Starting demolition without confirmed approvals is one of the fastest ways to turn a six-week renovation into a six-month one.
Specs and questions to ask your team
Before any demolition begins, get clear written answers on the following:
- Does your project require a building permit under Victorian building regulations?
- Has your builder arranged an inspection of any walls marked for removal?
- Are there asbestos, gas lines, or plumbing behind surfaces scheduled for demolition?
- Has council sign-off been confirmed in writing before physical work starts?
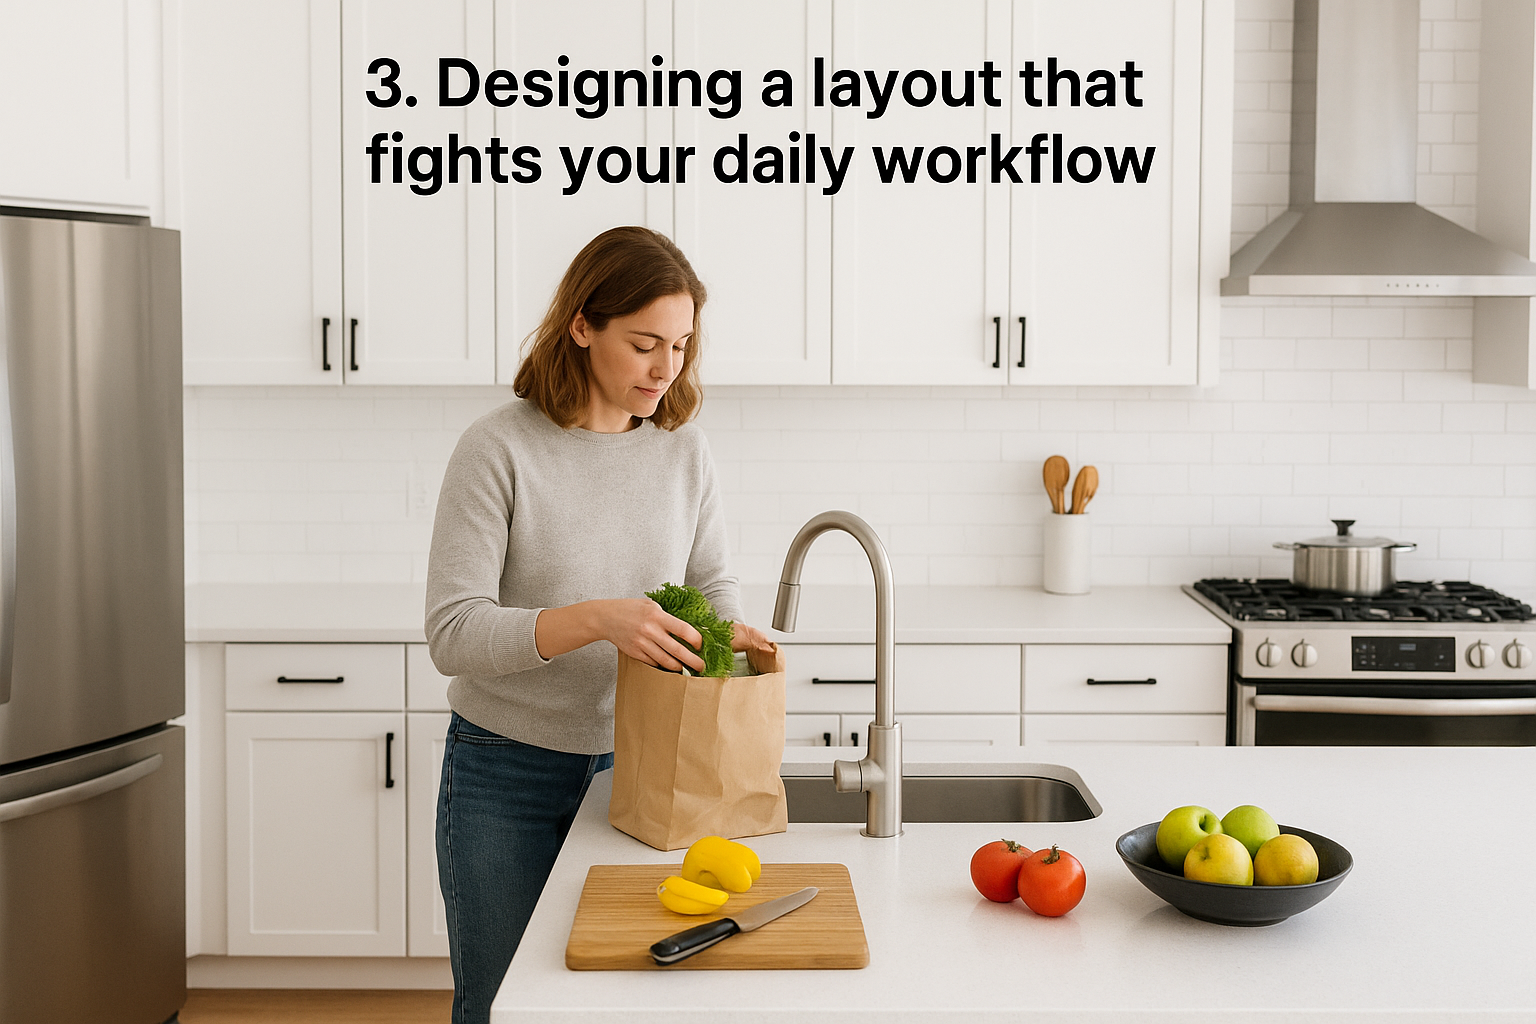
3. Designing a layout that fights your daily workflow
A kitchen can look stunning in a render and still fail you every single day you use it. Layout decisions that ignore how you actually move through the space rank among the most common kitchen renovation mistakes to avoid, because you live with the consequences long after the build is complete.
Why it happens
Most people design a kitchen based on aesthetics first, choosing the look they want before thinking through how they’ll cook, clean, and move around. Designers who skip questions about your daily habits often default to layouts that photograph well rather than function well.
How to avoid it
Start by mapping your actual kitchen habits before you touch a floor plan. Think about where you unpack groceries, how you move between the fridge, sink, and cooktop, and where things tend to land during meal prep. The classic work triangle (fridge, sink, cooktop) reflects how most people naturally move, but your household may need a different configuration entirely.
The best kitchen layout is designed around how you live in it, not how it looks in a photo.
Then walk through the workflow physically with your builder or designer. Pretend you’re unloading shopping, prepping, and plating food. If the sequence feels awkward at this stage, it will feel worse once the cabinetry is fixed in place.
Specs and questions to ask your team
Run through these questions with your builder before the floor plan is locked in. The answers will tell you whether your design actually supports how you cook or simply looks good on paper.
- What is the distance between your fridge, sink, and cooktop, and does it allow you to move between them without crossing paths?
- Where will wet prep and dry prep zones sit relative to each other?
- Have you accounted for multiple people working in the kitchen at the same time?
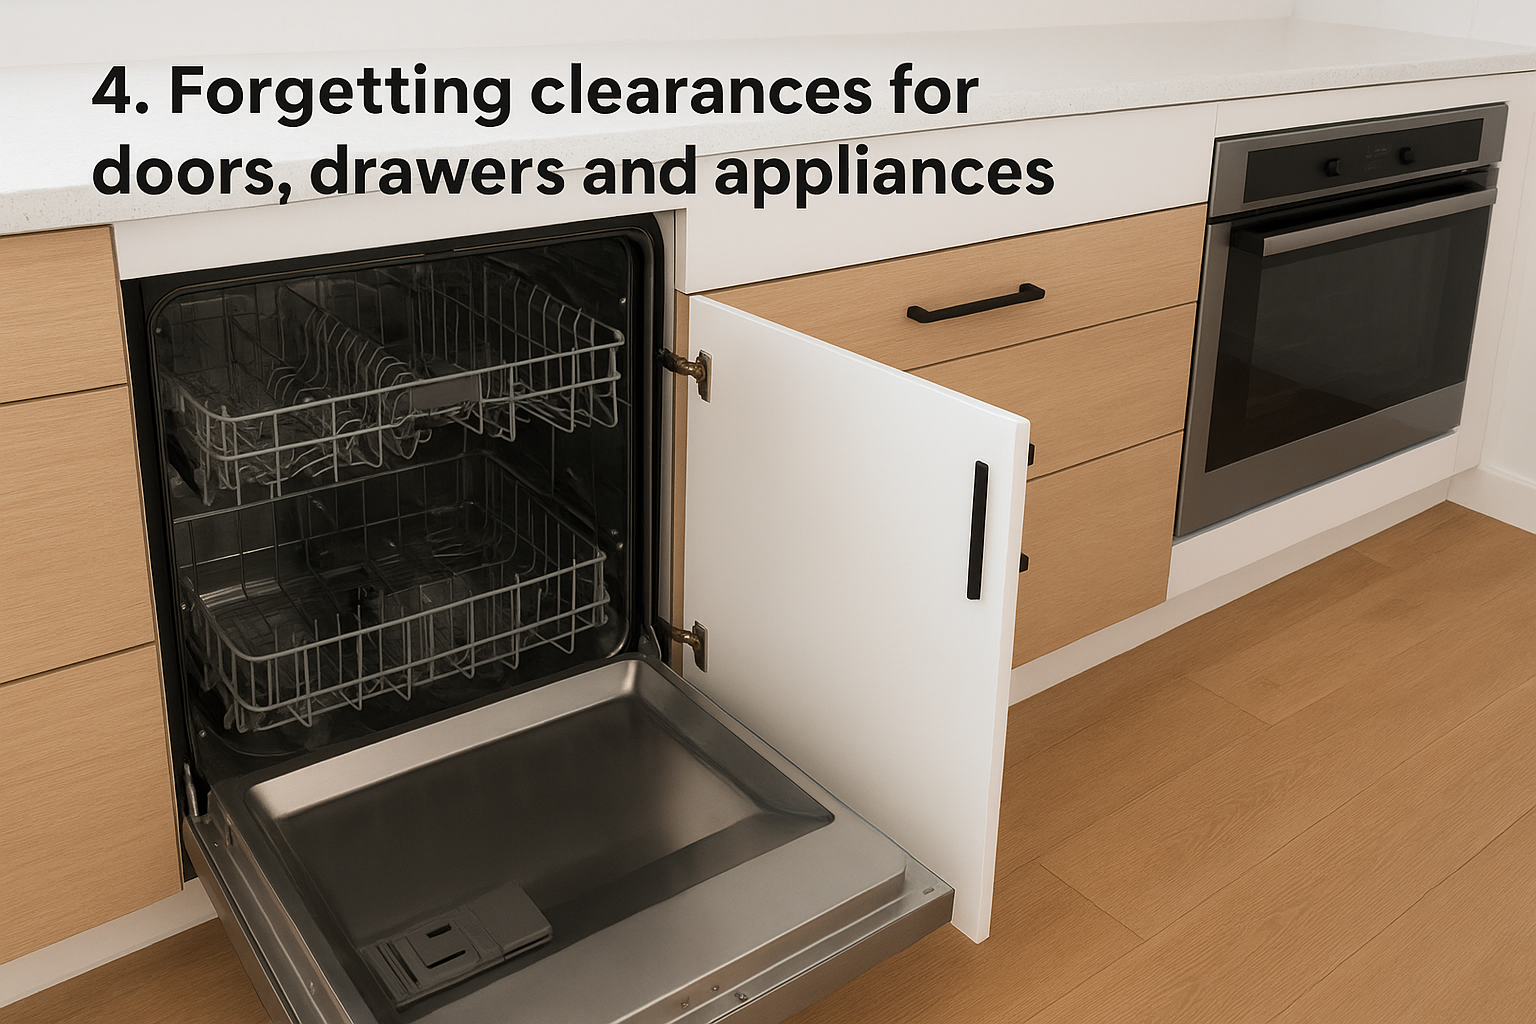
4. Forgetting clearances for doors, drawers and appliances
Clearance issues are one of the quieter kitchen renovation mistakes to avoid, because they rarely show up on a floor plan but hit hard the moment you open your dishwasher into the base of your island bench. Collisions between doors, drawers, and appliances are not just annoying; they cause damage over time and make the space genuinely harder to use.
Why it happens
Most plans are drawn in two dimensions, and 2D drawings don’t show swing arcs or open positions. A dishwasher door fully open, an oven that drops down, a fridge that pulls wide, these all need clear floor space that isn’t always reserved on the plan. Designers working quickly sometimes skip this step entirely, leaving the builder to discover the conflict once cabinetry is already installed.
How to avoid it
Ask your builder to review every door swing, drawer pull, and appliance opening against the fixed elements around them before any cabinetry is ordered. Walk through each zone with the actual appliance specifications in hand, not just placeholder dimensions. A 600mm dishwasher door needs roughly 600mm of clear floor space in front of it to open fully without blocking the walkway.
Checking clearances before you order cabinetry costs you nothing. Fixing them after installation costs real money.
Specs and questions to ask your team
Run through these clearance checks with your builder before anything goes on order. Pay particular attention to appliance doors that open towards walkways or adjacent cabinetry, as these are the spots most often missed in a flat plan.
- Does the dishwasher door open fully without hitting an adjacent drawer or island leg?
- Can the oven door drop down without blocking the walkway or cabinetry beside it?
- Do drawer stacks clear each other when pulled out simultaneously?
- Is there 600mm minimum clearance in front of frequently used appliances?
5. Underestimating bench space and landing zones
Bench space is one of the most underestimated elements in kitchen design, and one of the most frustrating kitchen renovation mistakes to avoid once you’re living with the result. A kitchen that looks proportionate on a plan can feel cramped and chaotic the moment you’re prepping a meal with groceries still on the counter.
Why it happens
Most people focus on the look of cabinetry and appliances rather than how much clear, usable bench space remains once everything is installed. Designers sometimes prioritise fitting in more storage or a larger island without checking how much functional bench run that leaves on the perimeter walls. The result is a kitchen where every surface is eaten up by appliances, leaving nowhere to actually work.
How to avoid it
Plan your landing zones deliberately before you finalise the layout. A landing zone is a clear section of bench where you can set down items directly next to an appliance, such as beside your oven, your fridge, or your cooktop. Each of those zones should have at minimum 400mm of clear bench on at least one side. If you’re working with a compact kitchen, discuss with your builder which appliances can be repositioned to free up more continuous bench run.
Running short on bench space is far easier to fix at the design stage than after your cabinetry has been installed.
Specs and questions to ask your team
Before you lock in the layout, confirm these details with your builder or kitchen designer:
- Is there at least 400mm of landing space beside the oven, fridge, and cooktop?
- What is the total continuous bench run available for food preparation?
- Have you accounted for appliances that will sit permanently on the bench, such as a kettle or coffee machine?
6. Skimping on storage and planning it too late
Storage is one of the most common kitchen renovation mistakes to avoid, and one that catches homeowners off guard because it looks fine on a floor plan right up until you’re living in the finished kitchen with nowhere to put anything. Adequate storage needs to be designed in from the start, not squeezed in as an afterthought once appliances and benchtops have already claimed the available wall space.
Why it happens
Most people focus their early design energy on the visual elements of a kitchen, benchtops, splashbacks, and cabinetry colours, and leave storage decisions until the layout is nearly finalised. By that stage, the best storage locations are already spoken for by other design choices, and what remains is often a collection of odd corners and shallow shelves that don’t actually hold much.
How to avoid it
Build your storage plan at the same time as your layout plan, not after it. Think through every category of item you need to store, from pots and pans to pantry goods, small appliances, cleaning products, and waste bins. Walk-in pantries, pull-out drawers, and tall cabinetry columns deliver far more usable storage than overhead cabinets alone. Discuss with your builder which wall runs allow for full-height cabinetry before those positions are committed to something else.
Designing storage last means you’ll spend the next decade working around the gaps your kitchen never had room for.
Specs and questions to ask your team
Confirm these storage basics with your builder before the cabinetry is ordered:
- Have you allocated storage zones for pantry, cleaning, waste, and small appliances separately?
- Does your design include full-height cabinetry on at least one wall run?
- Are pull-out drawers specified for base cabinets rather than fixed shelves?
7. Choosing finishes that look good but wear badly
Showroom samples and online photos show finishes at their absolute best, and that’s exactly where this kitchen renovation mistake catches people out. The finish that wins on aesthetics often loses badly once it’s exposed to daily cooking, cleaning, and contact.
Why it happens
Homeowners make finish selections under showroom lighting, with clean, untouched samples in hand. Matte surfaces, light stone benchtops, and high-gloss cabinetry all look striking in that setting but behave very differently in a working kitchen.
The decision gets made on visual appeal alone, without considering how the material handles heat, moisture, grease, and scratching over years of use. By the time the wear shows, the cabinetry is fixed and the benchtop is sealed down.
How to avoid it
Ask your supplier or builder for honest wear data before you commit to any finish. Engineered stone generally outperforms natural marble in a kitchen because it’s less porous and more resistant to staining. For cabinetry, polyurethane and two-pack finishes hold up far better than vinyl wrap in humid conditions. Matte benchtop surfaces can also be harder to keep clean than a polished or honed finish because they trap residue in their texture.
Choosing a finish purely on how it looks in a showroom is one of the kitchen renovation mistakes to avoid that costs you years of frustration.
Specs and questions to ask your team
Before you lock in any finish, run through these questions with your builder or supplier:
- What is the scratch and stain resistance rating of this benchtop material?
- How does the cabinetry finish perform in a high-moisture environment?
- What maintenance does this surface require to hold its appearance over five or more years?
8. Ignoring lighting layers and colour temperature
Lighting is one of the kitchen renovation mistakes to avoid that homeowners consistently underestimate, usually because the space looks perfectly fine under the builder’s standard downlights during a site inspection. Once you’re actually cooking and cleaning in the kitchen daily, flat single-source lighting reveals its limitations fast.
Why it happens
Most renovation budgets treat lighting as a late-stage decision, something to finalise once cabinetry and benchtops are sorted. Electricians are often briefed too late to integrate under-cabinet lighting or pendant wiring into the build properly, which means you end up with a single row of downlights that leaves benchtops in shadow and makes the whole space feel dim and uninviting.
How to avoid it
Plan your lighting across three layers: ambient (general room light), task (direct bench illumination), and accent (feature or display lighting). Under-cabinet LED strips make a significant difference to bench visibility and are far easier to wire before cabinetry is installed than after. Pay close attention to colour temperature as well: kitchens generally work best with warm white (around 2700K to 3000K) rather than the cool white (5000K and above) common in commercial spaces, which can make food look unappetising and finishes look harsh.
Getting your electrician involved before cabinetry goes in gives you lighting options that simply are not available once the walls are closed up.
Specs and questions to ask your team
Before your electrician finalises the plan, confirm these points:
- Are under-cabinet lighting runs wired before cabinetry installation begins?
- What colour temperature are the specified downlights, and does it suit the kitchen’s finish palette?
- Is there a separate switch or dimmer for each lighting layer?
9. Not adding enough power points and circuits
Power points are one of the kitchen renovation mistakes to avoid that only becomes obvious once your kitchen is finished and you’re running an extension cord across the bench. Electrical capacity is far cheaper to increase during a renovation than after walls and cabinetry are sealed.
Why it happens
Most homeowners base their power point count on what they currently use, not on what they’ll need once the new kitchen is fully fitted out. Appliance loads in modern kitchens are significantly higher than they were even ten years ago. Induction cooktops, steam ovens, coffee machines, and refrigerators with integrated displays each draw dedicated power, and a single circuit shared across multiple high-draw appliances will trip your switchboard regularly.
How to avoid it
Brief your electrician on every appliance you plan to use in the kitchen before the rough-in stage begins. Dedicated circuits for your oven, cooktop, and dishwasher are standard practice in Australian residential builds, but you also need to account for bench-level power points for small appliances and a separate supply if you’re adding a fridge to an island. Build in two to three additional power points beyond what you think you need on your primary bench run, because you will use them.
Getting your electrician on-site before cabinetry goes in gives you the flexibility to add circuits and points at a fraction of the cost you’d pay later.
Specs and questions to ask your team
Work through these points with your electrician before the rough-in is complete:
- Does your oven and cooktop each have a dedicated circuit rated to the appliance specification?
- How many bench-level double power points are included on the primary work wall?
- Is there a separate circuit allocated for a refrigerator or appliances on the island?
10. Getting ventilation wrong and trapping grease and odours
Poor ventilation is one of the kitchen renovation mistakes to avoid that tends to get dismissed during the planning phase and becomes impossible to ignore once you’re living in the finished kitchen. Grease, steam, and cooking odours that can’t escape build up on surfaces, penetrate cabinetry, and leave your kitchen smelling stale within hours of cooking.
Why it happens
Ventilation decisions often get left to the final stages of a renovation, after the layout, cabinetry, and appliances are already locked in. Many homeowners assume the rangehood included in a standard kitchen package is sufficient, without checking whether it’s actually sized to handle the cooktop output it sits above. Recirculating rangehoods, which filter and return air rather than exhausting it outside, are also widely specified where ducted extraction would perform significantly better.
How to avoid it
Match your rangehood extraction rate to your cooktop’s output before you commit to either appliance. As a general guide, a ducted rangehood should move at least 600 cubic metres of air per hour for a standard four-burner cooktop. If you’re installing an induction or gas cooktop with higher output burners, that number needs to go up. Always prioritise ducted extraction over recirculating systems wherever your layout allows, because recirculating units do not remove humidity or airborne grease particles from the room.
Specifying a rangehood by appearance alone, rather than extraction capacity, is one of the easiest ways to end up with a ventilation system that simply cannot keep up.
Specs and questions to ask your team
Confirm these ventilation details with your builder and appliance supplier before anything is ordered:
- What is the extraction rate in cubic metres per hour of the specified rangehood, and does it match your cooktop output?
- Is the rangehood ducted to the outside, or does it recirculate filtered air back into the room?
- Has the duct run length and number of bends been checked against the rangehood manufacturer’s performance specifications?
11. Blowing the budget with poor allowances and variations
Budget overruns are one of the most stressful kitchen renovation mistakes to avoid, and they almost always trace back to two problems: allowances set too low at the quoting stage and variations approved without tracking their cumulative cost.
Why it happens
Most renovation quotes include provisional sums for items not yet fully specified at the time of signing, things like tiles, tapware, or appliances. These figures are estimates, not guaranteed costs, and they’re frequently set lower than what clients actually spend once they visit a showroom. Each upgrade you make mid-build gets processed as a variation, and variations carry margins. A series of small upgrades that each feel minor can collectively push your final invoice well above the original quote before you realise what’s happened.
How to avoid it
Lock in as many material and appliance selections as possible before you sign your contract, so provisional sums are replaced with confirmed costs. Ask your builder to show you what each provisional sum covers and what a realistic spend looks like based on recent projects at a similar scope. When you do approve a variation, record the cost in writing against a running total so you can see exactly how far you’ve moved from the original figure before the next one arrives.
Tracking every variation against your original contract price is the single most effective way to avoid budget shock at the end of a renovation.
Specs and questions to ask your team
Before you sign the contract, clarify the following with your builder:
- Which line items in your quote are provisional sums, and what are the realistic ranges for each?
- What is the process for approving and recording variations in writing throughout the build?
- Has your builder built in a contingency allowance of at least 10% for unexpected site conditions?
12. Ordering late and missing lead times
Late orders are one of the kitchen renovation mistakes to avoid that quietly derail timelines while everything else appears to be running on track. Cabinetry, appliances, and stone benchtops often carry lead times of six to twelve weeks, and if you haven’t placed orders before demolition starts, you’ll hit a standstill mid-build with tradespeople idle and daily costs still running.
Why it happens
Most homeowners don’t realise that standard kitchen components are rarely held in stock and need to be manufactured or imported to order. The selection process also takes longer than expected, with showroom visits, sample reviews, and supplier quotes all eating into the available lead time before anyone notices how far the calendar has slipped.
How to avoid it
Treat your materials and appliance orders as part of the construction schedule, not a task you handle once the build has started. Work backwards from your target completion date with your builder to identify the latest possible order date for each item, then aim to beat that date by at least two weeks. Stone benchtops in particular require templating after cabinetry is installed, so factor in that step as a separate milestone.
Placing your orders late is one of the most avoidable reasons a kitchen renovation runs over time and over budget.
Specs and questions to ask your team
Before your builder starts on site, get clear written confirmation on the following points:
- What are the confirmed lead times for cabinetry, benchtops, and appliances?
- Has your builder scheduled the stone templating appointment at the correct build stage?
- Are all supplier orders placed and confirmed in writing before demolition begins?
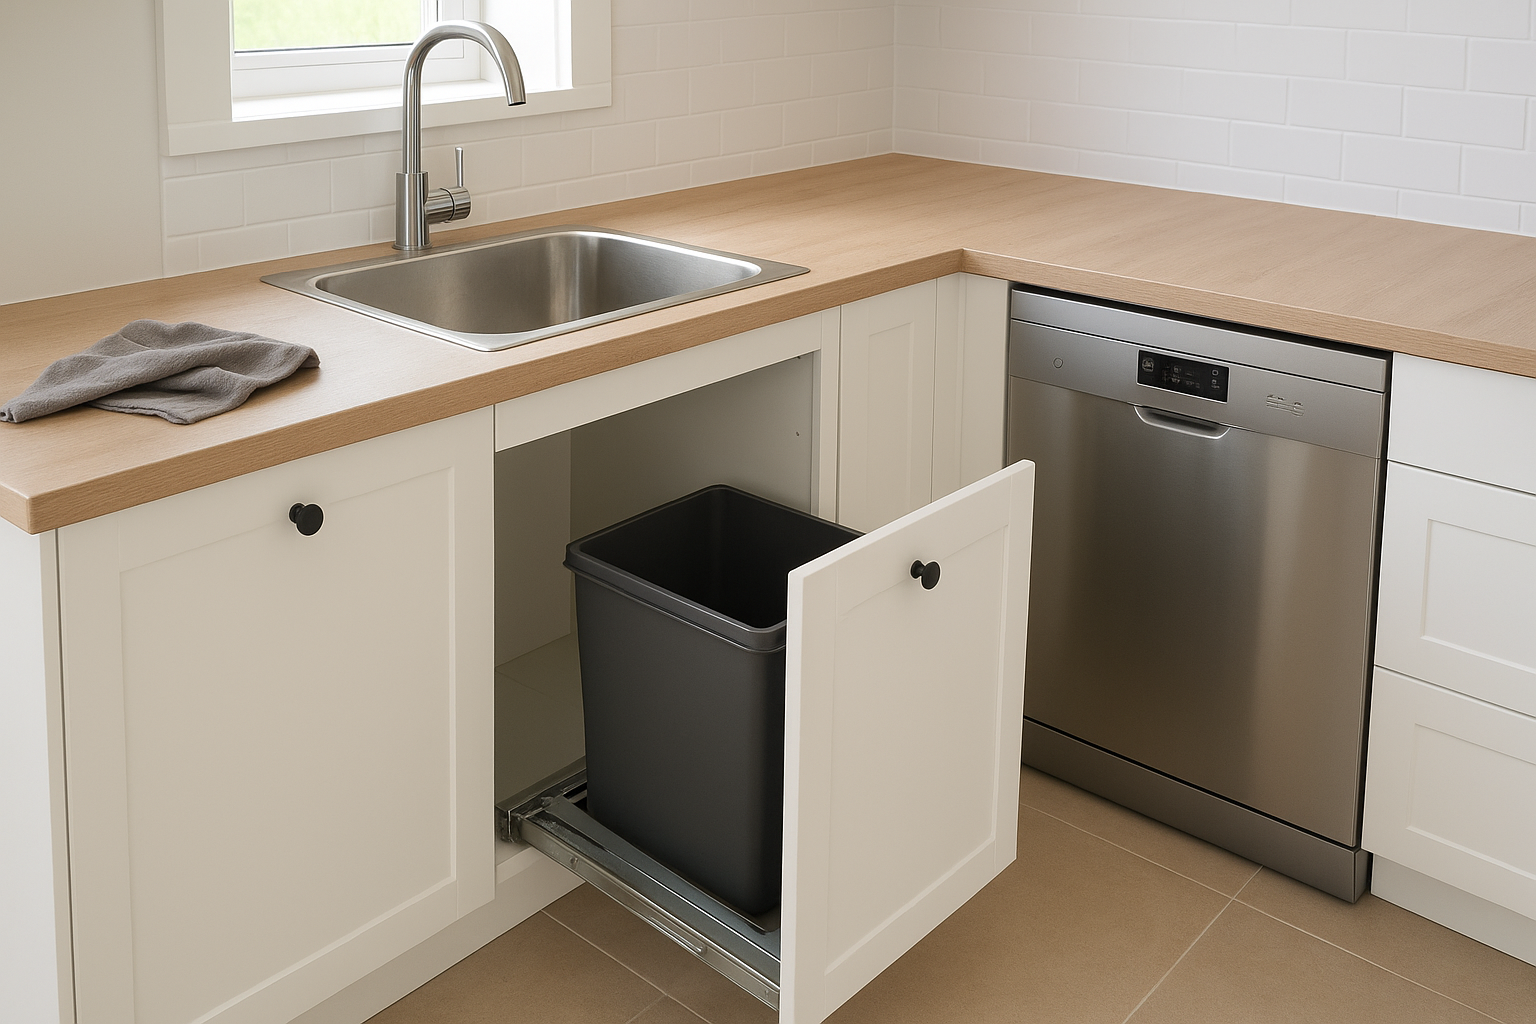
13. Putting the sink, bin and dishwasher in the wrong mix
The relationship between your sink, bin, and dishwasher is one of the most practical clustering decisions in kitchen design, and it’s also one of the kitchen renovation mistakes to avoid that quietly makes daily tasks more frustrating than they need to be. Separating these three elements forces you to carry dripping dishes across the kitchen and ferry food scraps past your prep zone every time you clean up.
Why it happens
Most layouts get designed around visual balance and cabinetry symmetry rather than task flow. Designers sometimes place the sink beneath a window for aesthetic reasons without checking whether the dishwasher position makes logical sense beside it. The bin location gets decided even later, often dropped into whatever base cabinet is left over once everything else has been positioned.
How to avoid it
Keep your sink, dishwasher, and bin within a single zone so the clean-up sequence runs in one direction without backtracking. The dishwasher should sit directly beside the sink, on the side that matches your dominant hand if possible, so you can rinse and load in one motion. Your pull-out bin belongs in the base cabinet closest to the sink and prep area, not tucked away in a corner.
Treating the sink, bin, and dishwasher as a single cluster rather than three separate decisions makes daily clean-up faster and less messy.
Specs and questions to ask your team
Before the layout is finalised, confirm the following with your builder:
- Is the dishwasher positioned directly beside the sink with plumbing to match?
- Does the pull-out bin cabinet sit within arm’s reach of the sink?
- Has the plumber confirmed the drain and water supply locations support this clustering?
14. Choosing flooring that cannot handle a kitchen
Flooring is one of the kitchen renovation mistakes to avoid that tends to get decided on looks alone, without any real thought given to what the surface needs to handle every day. A kitchen floor takes water, grease, dropped utensils, and constant foot traffic, and not every flooring product marketed as stylish is actually built for that kind of punishment.
Why it happens
Homeowners often select flooring during a showroom visit where everything looks polished and pristine. Timber-look options and large-format tiles photograph beautifully and often carry lower price tags than their more durable alternatives, which makes them easy to choose early in the process when the focus is still on aesthetics rather than performance. The reality of how a surface behaves after two years of daily cooking rarely comes up in that conversation.
How to avoid it
Prioritise slip resistance, water resistance, and durability before you consider colour or format. Porcelain tiles rated to P3 or higher on the slip resistance scale are a practical choice for kitchens because they handle moisture and are easy to clean without degrading over time. If you want a timber look, opt for a waterproof vinyl plank product rated for wet areas rather than engineered timber, which can swell and gap when it meets regular water exposure near the sink.
Choosing a kitchen floor based purely on how it looks in a showroom is a decision you’ll regret the first time you mop up a spill and watch the surface lift.
Specs and questions to ask your team
Before you commit to any flooring product, confirm the following with your builder:
- What is the slip resistance rating of the specified flooring, and does it meet Australian Standard AS 4586?
- Is the product rated for wet area use in a residential kitchen environment?
- How does the flooring handle expansion and contraction near the sink and dishwasher?
15. Forgetting the future, accessibility and resale fit
Designing a kitchen purely for the way you live right now is one of the kitchen renovation mistakes to avoid that homeowners rarely consider until their circumstances change. A kitchen that works perfectly for a household today can become a daily obstacle if mobility changes, your family grows, or you decide to sell.
Why it happens
Most people design for their current household, not for who might live in the home five or ten years from now. Accessibility features are often dismissed as unnecessary during the planning phase because they feel irrelevant to younger, able-bodied homeowners. Resale considerations get similarly ignored because selling feels like a distant concern when you’re focused on getting the renovation finished.
How to avoid it
Build in small, low-cost decisions that give your kitchen lasting flexibility. Specifying lever-style tapware instead of knobs, ensuring bench heights accommodate a range of users, and keeping at least one clear floor space of 800mm x 1300mm near the sink and cooktop all improve usability without changing the overall look. For resale, neutral finishes and well-placed storage consistently outperform highly personalised design choices with future buyers.
A kitchen designed with a little flexibility built in from the start holds its value for longer and serves your household through more stages of life.
Specs and questions to ask your team
Before you finalise the design, confirm these points with your builder:
- Are tapware and hardware specified with lever or bar-style handles rather than knobs?
- Is there 800mm of clear floor space maintained in front of primary appliances?
- Do your finish and colour selections appeal broadly enough to support resale value?

Next steps
Every kitchen renovation mistake to avoid on this list traces back to the same root problem: decisions made too late, without the right people involved early enough to make a difference. When you plan deliberately, bring your builder in before the design is locked, and confirm your material orders before demolition starts, you cut off the majority of cost overruns and timeline blowouts before they get a chance to take hold.
Your kitchen should work hard for your household for decades, and the planning stage is your only real window to get the details right without paying to undo them later. If you’re ready to start a kitchen renovation in Melbourne’s northern or western suburbs, talk to the team at Transformer Homes about what your project actually needs. We’ll help you build a kitchen that fits how you live, not just how it looks on paper.
