Planning a kitchen renovation starts long before anyone picks up a hammer. The IKEA Kitchen Planner is a free online tool that lets you design your kitchen layout in 3D, choosing cabinets, benchtops, and appliances, so you can visualise the finished space before spending a cent.
Whether you’re mapping out a quick refresh or a full gut-and-rebuild, having a clear layout makes every decision easier. At Transformer Homes, we handle kitchen renovations across Melbourne’s north and west, and we regularly work with clients who’ve already sketched out ideas using tools exactly like this. A well-thought-out plan means fewer surprises once construction begins.
In this guide, we’ll walk you through how the IKEA Kitchen Planner works, how to get the most out of it, and what to keep in mind if you’re using it as a starting point for a bigger renovation project.
What the IKEA Kitchen Planner is and what you need
The IKEA Kitchen Planner is a free, browser-based 3D design tool that lets you build a virtual kitchen using IKEA’s cabinet range. You drag and drop units into a digital room, adjust dimensions, swap finishes, and get a realistic view of how the space will look. It also generates a parts list and estimated cost, which makes it a practical starting point well before you commit to any purchases.
The planner runs entirely in your browser, so there’s no software to install and no account required to get started.
What the tool actually does
Once you input your room dimensions, the planner lets you place base cabinets, wall cabinets, and tall units from IKEA’s METOD range. You can add appliances, choose door styles and colours, and switch benchtop materials. The 3D view rotates freely, so you can check sight lines, corner clearances, and how your chosen finishes interact with the overall space.
When you finish, you can save your plan, share it with a builder or partner, and export a full shopping list with item codes. That export is what makes the tool genuinely useful: it bridges the gap between an idea on screen and an actual order at the checkout.
What you need before you open the tool
Walking in without preparation wastes time. Before you launch the ikea kitchen planner, gather the following:
- Accurate room measurements: length, width, and ceiling height in millimetres
- Window and door positions: including which way each door swings
- Fixed service locations: sink waste pipe, gas point, rangehood exhaust, and power outlets
- Appliance dimensions: if you’re keeping existing appliances, measure them exactly
- A clear budget ceiling so you can filter finishes accordingly
Having this information ready means you focus on layout decisions rather than stopping to re-measure halfway through.
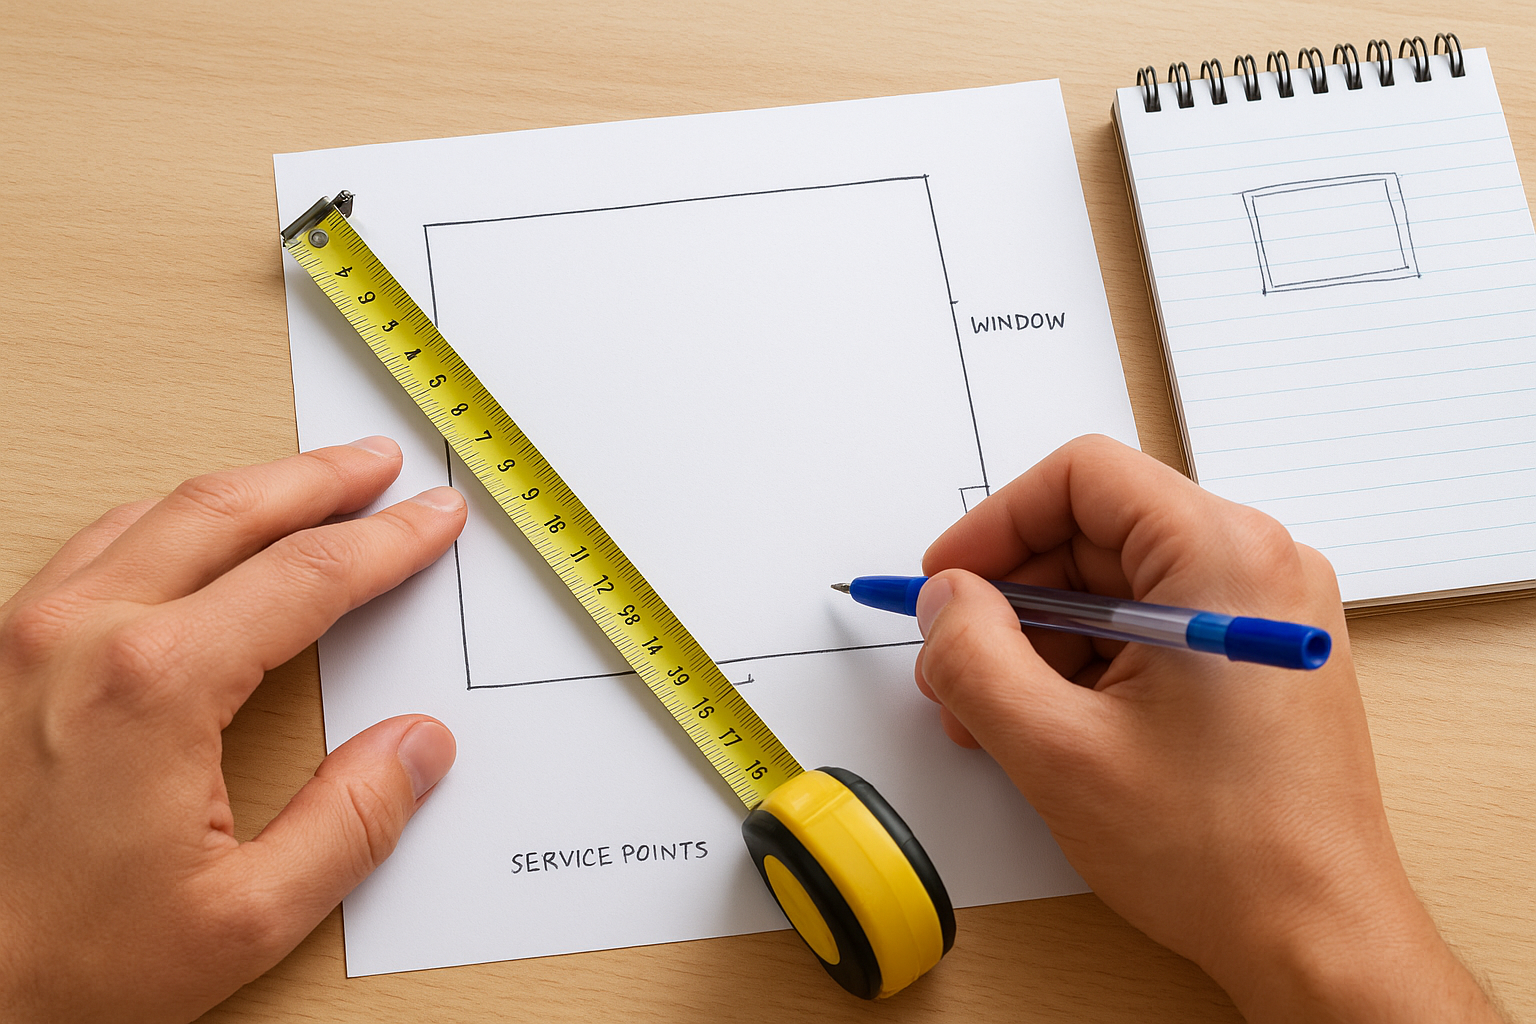
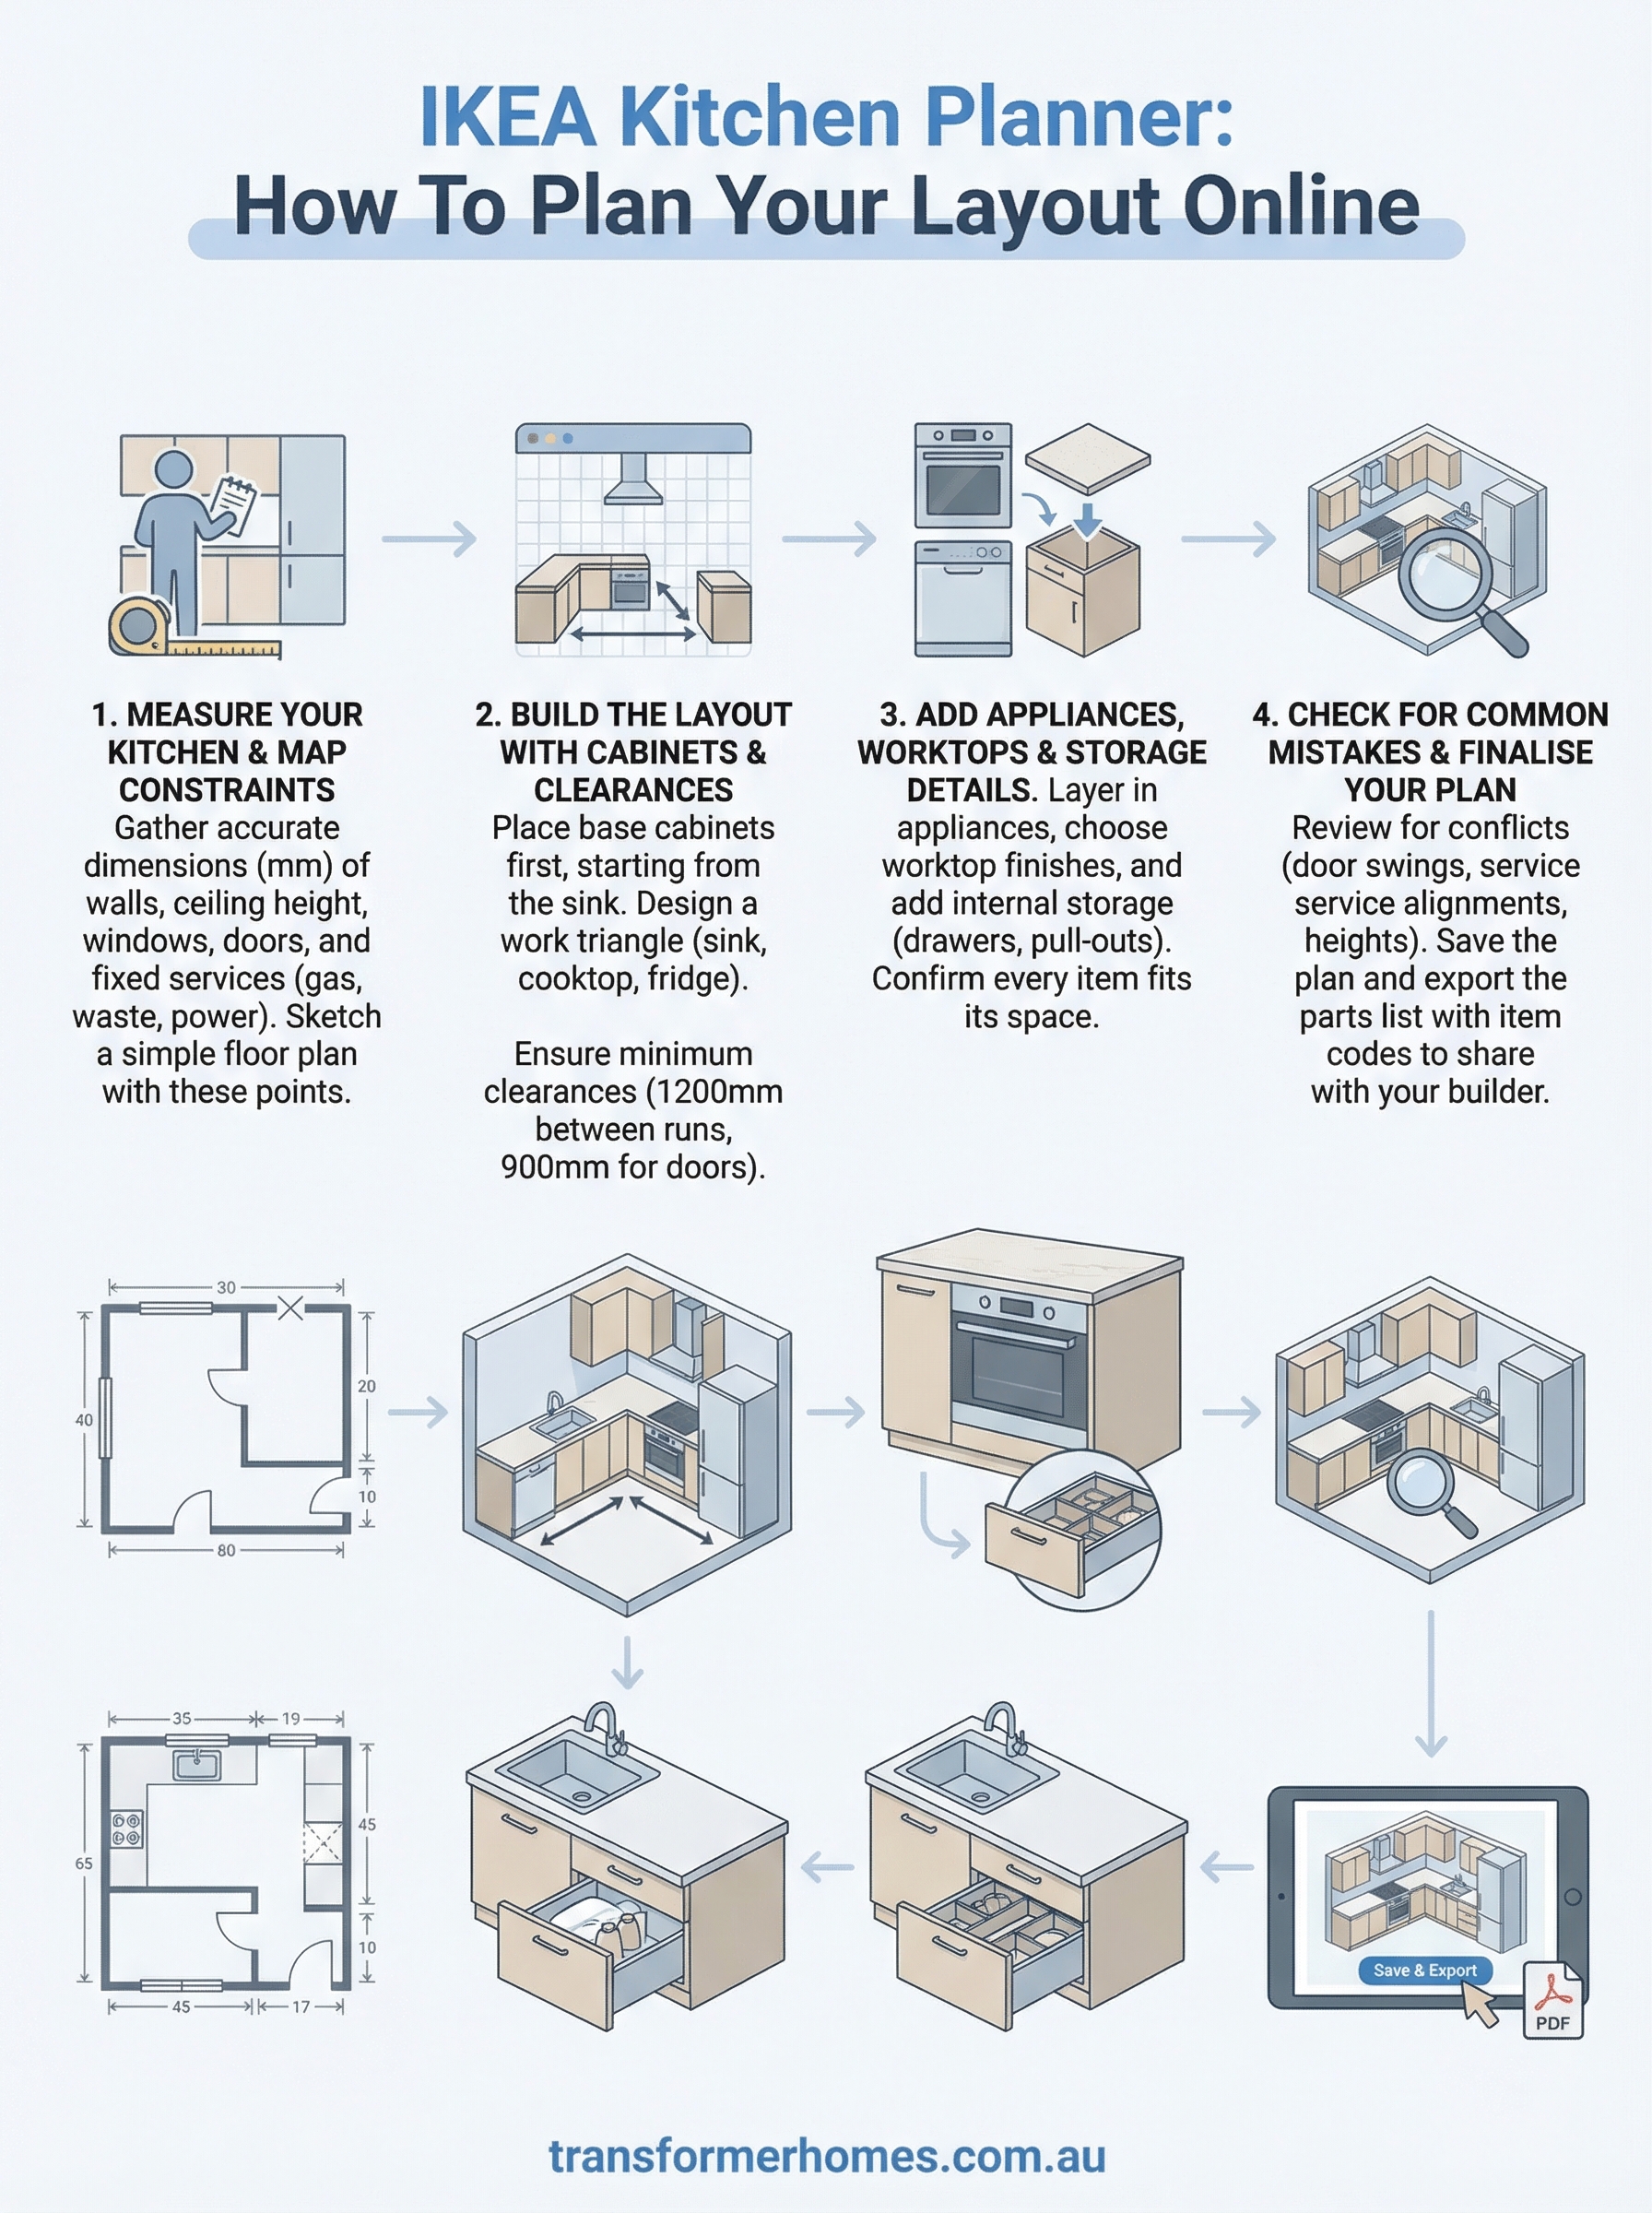
Step 1. Measure your kitchen and map the constraints
Good measurements are the foundation of any useful kitchen plan. Before you open the IKEA kitchen planner, spend 20 minutes in your kitchen with a tape measure and notepad. Inaccurate dimensions will push your layout off from the start, and you’ll end up redesigning from scratch once your cabinets arrive.
Measure in millimetres, not centimetres. IKEA’s cabinet system works on millimetre increments, and even a 10mm error can mean a unit won’t fit.
What to measure
Record every dimension that affects where cabinets and appliances can go. Focus on fixed elements that cannot move, and note anything that creates a hard constraint on your layout.
| Element | What to record |
|---|---|
| Floor to ceiling | Height in mm |
| Wall lengths | Each wall individually |
| Windows | Width, height, and sill height from floor |
| Doors | Width and swing direction |
| Service points | Waste pipe, gas point, power outlets |
How to map it on paper
Sketch the room as a simple floor plan before entering any numbers into the planner. Mark your service locations clearly so you know which walls are restricted.
Use this as a quick checklist before moving on:
- Walls measured and labelled
- Windows and doors marked with swing direction
- Gas, water, and power points noted
- Ceiling height confirmed
Step 2. Build the layout with cabinets and clearances
With your measurements in hand, open the IKEA kitchen planner and input your room dimensions. Start by placing base cabinets first, as they anchor everything else in the layout. Work around the perimeter before filling in any island or peninsula.
Place your sink cabinet directly against the wall where the waste pipe sits, then build outward from there.
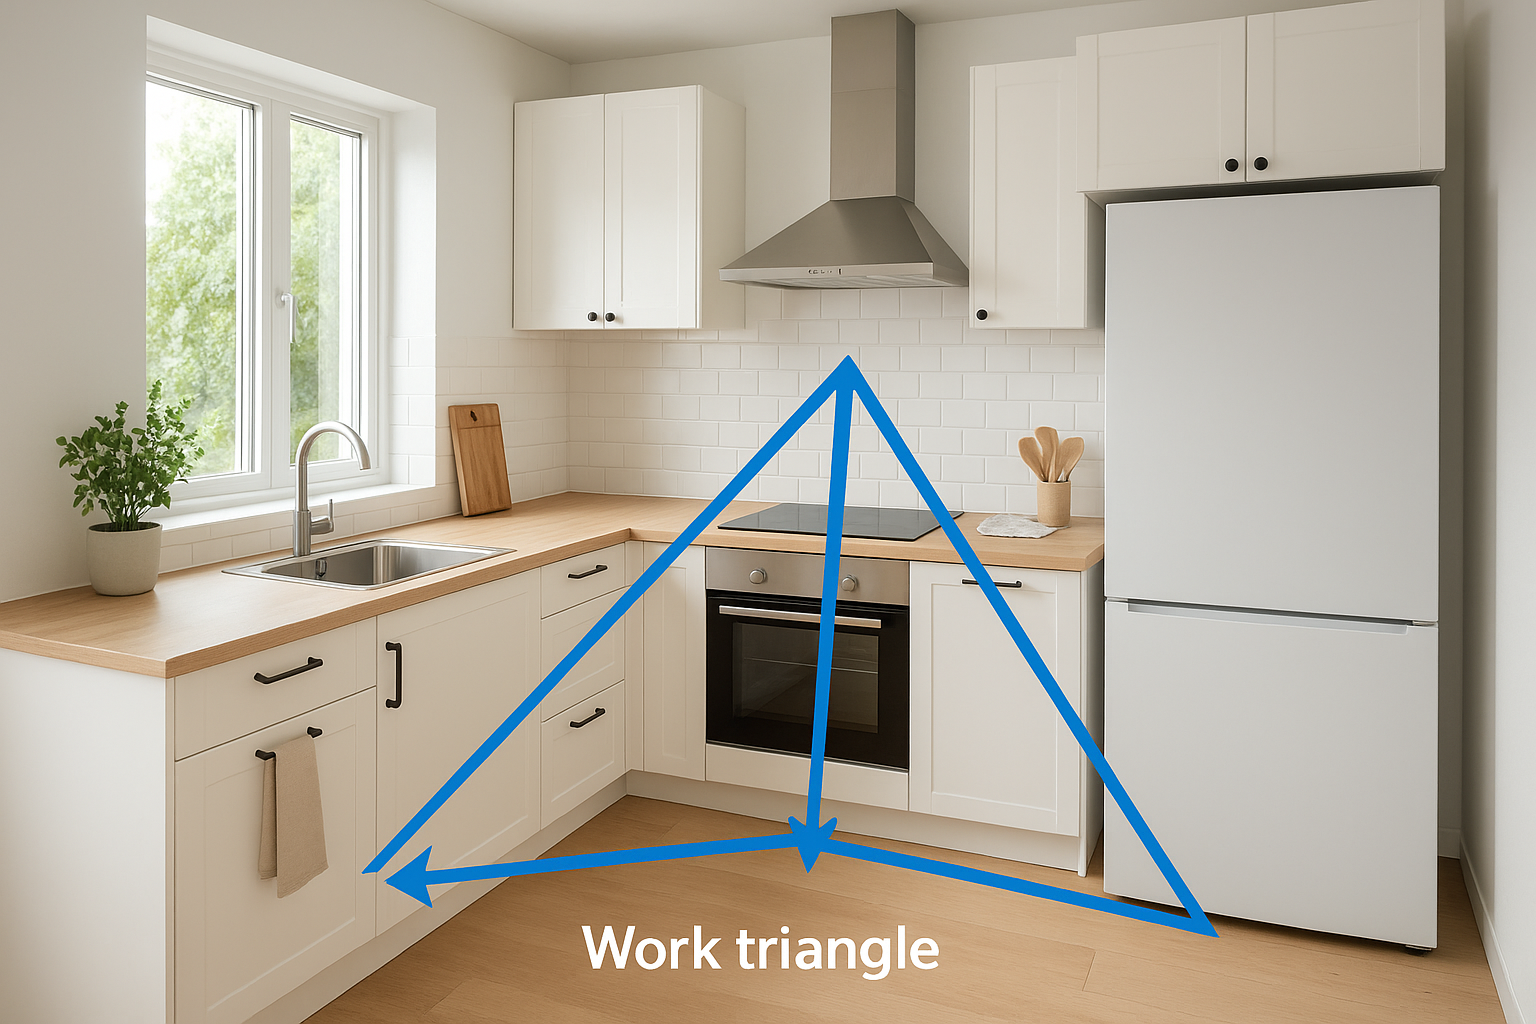
Start with the work triangle
The work triangle connects your sink, cooktop, and fridge. Keeping each leg between 1,200mm and 2,700mm reduces unnecessary movement while you cook. In the planner, place these three points first, then fill the remaining cabinet runs around them.
Minimum clearances to follow
Tight clearances cause problems once cabinets are installed. Build these into your plan before you add anything else:
| Area | Minimum clearance |
|---|---|
| Between facing cabinet runs | 1,200mm |
| In front of oven or dishwasher | 900mm for door swing |
| Corner cabinet access | 400mm each side |
| Rangehood above cooktop | 650mm to 750mm |
Confirm every clearance in the 3D view by rotating the camera and checking from multiple angles. Tight corners and appliance swing paths are the two spots most plans get wrong.
Step 3. Add appliances, worktops, and storage details
With your cabinet runs set, the IKEA kitchen planner lets you layer in the details that shape both the look and function of the space. Add appliances first, then worktops, and finally internal storage fittings so each layer informs the next.
Confirm every appliance fits inside its allocated cabinet opening before you move on to worktops.
Placing appliances and choosing worktops
Drop your oven, dishwasher, and rangehood into position from the appliance menu, then verify the clearances from Step 2 still hold. The planner lets you compare laminate, stone-effect, and wood finishes against your chosen door colour in the 3D view. Run through this checklist before moving forward:
- Oven opening matches your appliance dimensions exactly
- Rangehood height sits between 650mm and 750mm above the cooktop
- Worktop overhang set to 40mm on all exposed edges
Adding internal storage fittings
The planner’s storage section lets you place pull-out drawers, corner carousels, and bin inserts directly inside your base cabinets. Check that each cabinet’s internal width can accommodate the fitting you want: a standard pull-out bin requires a 400mm minimum base unit.
Placing these fittings while your 3D view is complete lets you spot conflicts between neighbouring units before you finalise the plan. Catching these details at this stage costs nothing to fix.
Step 4. Check for common mistakes and finalise your plan
Before you export your plan from the IKEA kitchen planner, run a final check to catch errors that are easy to overlook. Most problems at this stage involve overlooked clearances or mismatched appliance sizes that only become obvious when you review the full 3D view from multiple fresh angles.
Common mistakes to look for
Small errors in cabinet placement and clearances compound quickly once you’re into the build. Review your plan against this checklist before you lock in your final selections:
- Cabinet runs don’t align with your fixed service points (sink waste, gas)
- Rangehood height sits outside the 650mm to 750mm required range
- Corner cabinets block each other’s door swing paths
- Tall units create dead zones that cut off natural light from windows
- Drawer clearances conflict with adjacent appliance doors
How to finalise and share your plan
Once you’ve cleared the checklist, save your plan using the tool’s built-in save function and export the parts list as a PDF. Share this file directly with your builder or kitchen installer so they can cross-check your selections against site conditions before anything is ordered.
Your exported parts list includes IKEA item codes, which your builder can use to verify product dimensions against your actual kitchen measurements.
Next steps for your kitchen renovation
The IKEA kitchen planner gives you a solid foundation, but a 3D model and a parts list are only the beginning. Once you export your plan, share it with a licensed builder who can check your layout against site conditions, confirm service point locations, and flag anything that needs to change before you order a single cabinet.
Your plan also helps your builder price the job accurately from the start. When a builder can see your exact selections, cabinet runs, and appliance choices upfront, there are fewer assumptions and fewer cost surprises mid-build.
If you’re planning a kitchen renovation in Melbourne’s north or west, Transformer Homes can take your IKEA plan and turn it into a finished space that’s built to last. Bring your exported parts list and measurements, and we’ll work through the build process with you from start to finish. Talk to our team about your kitchen renovation.
