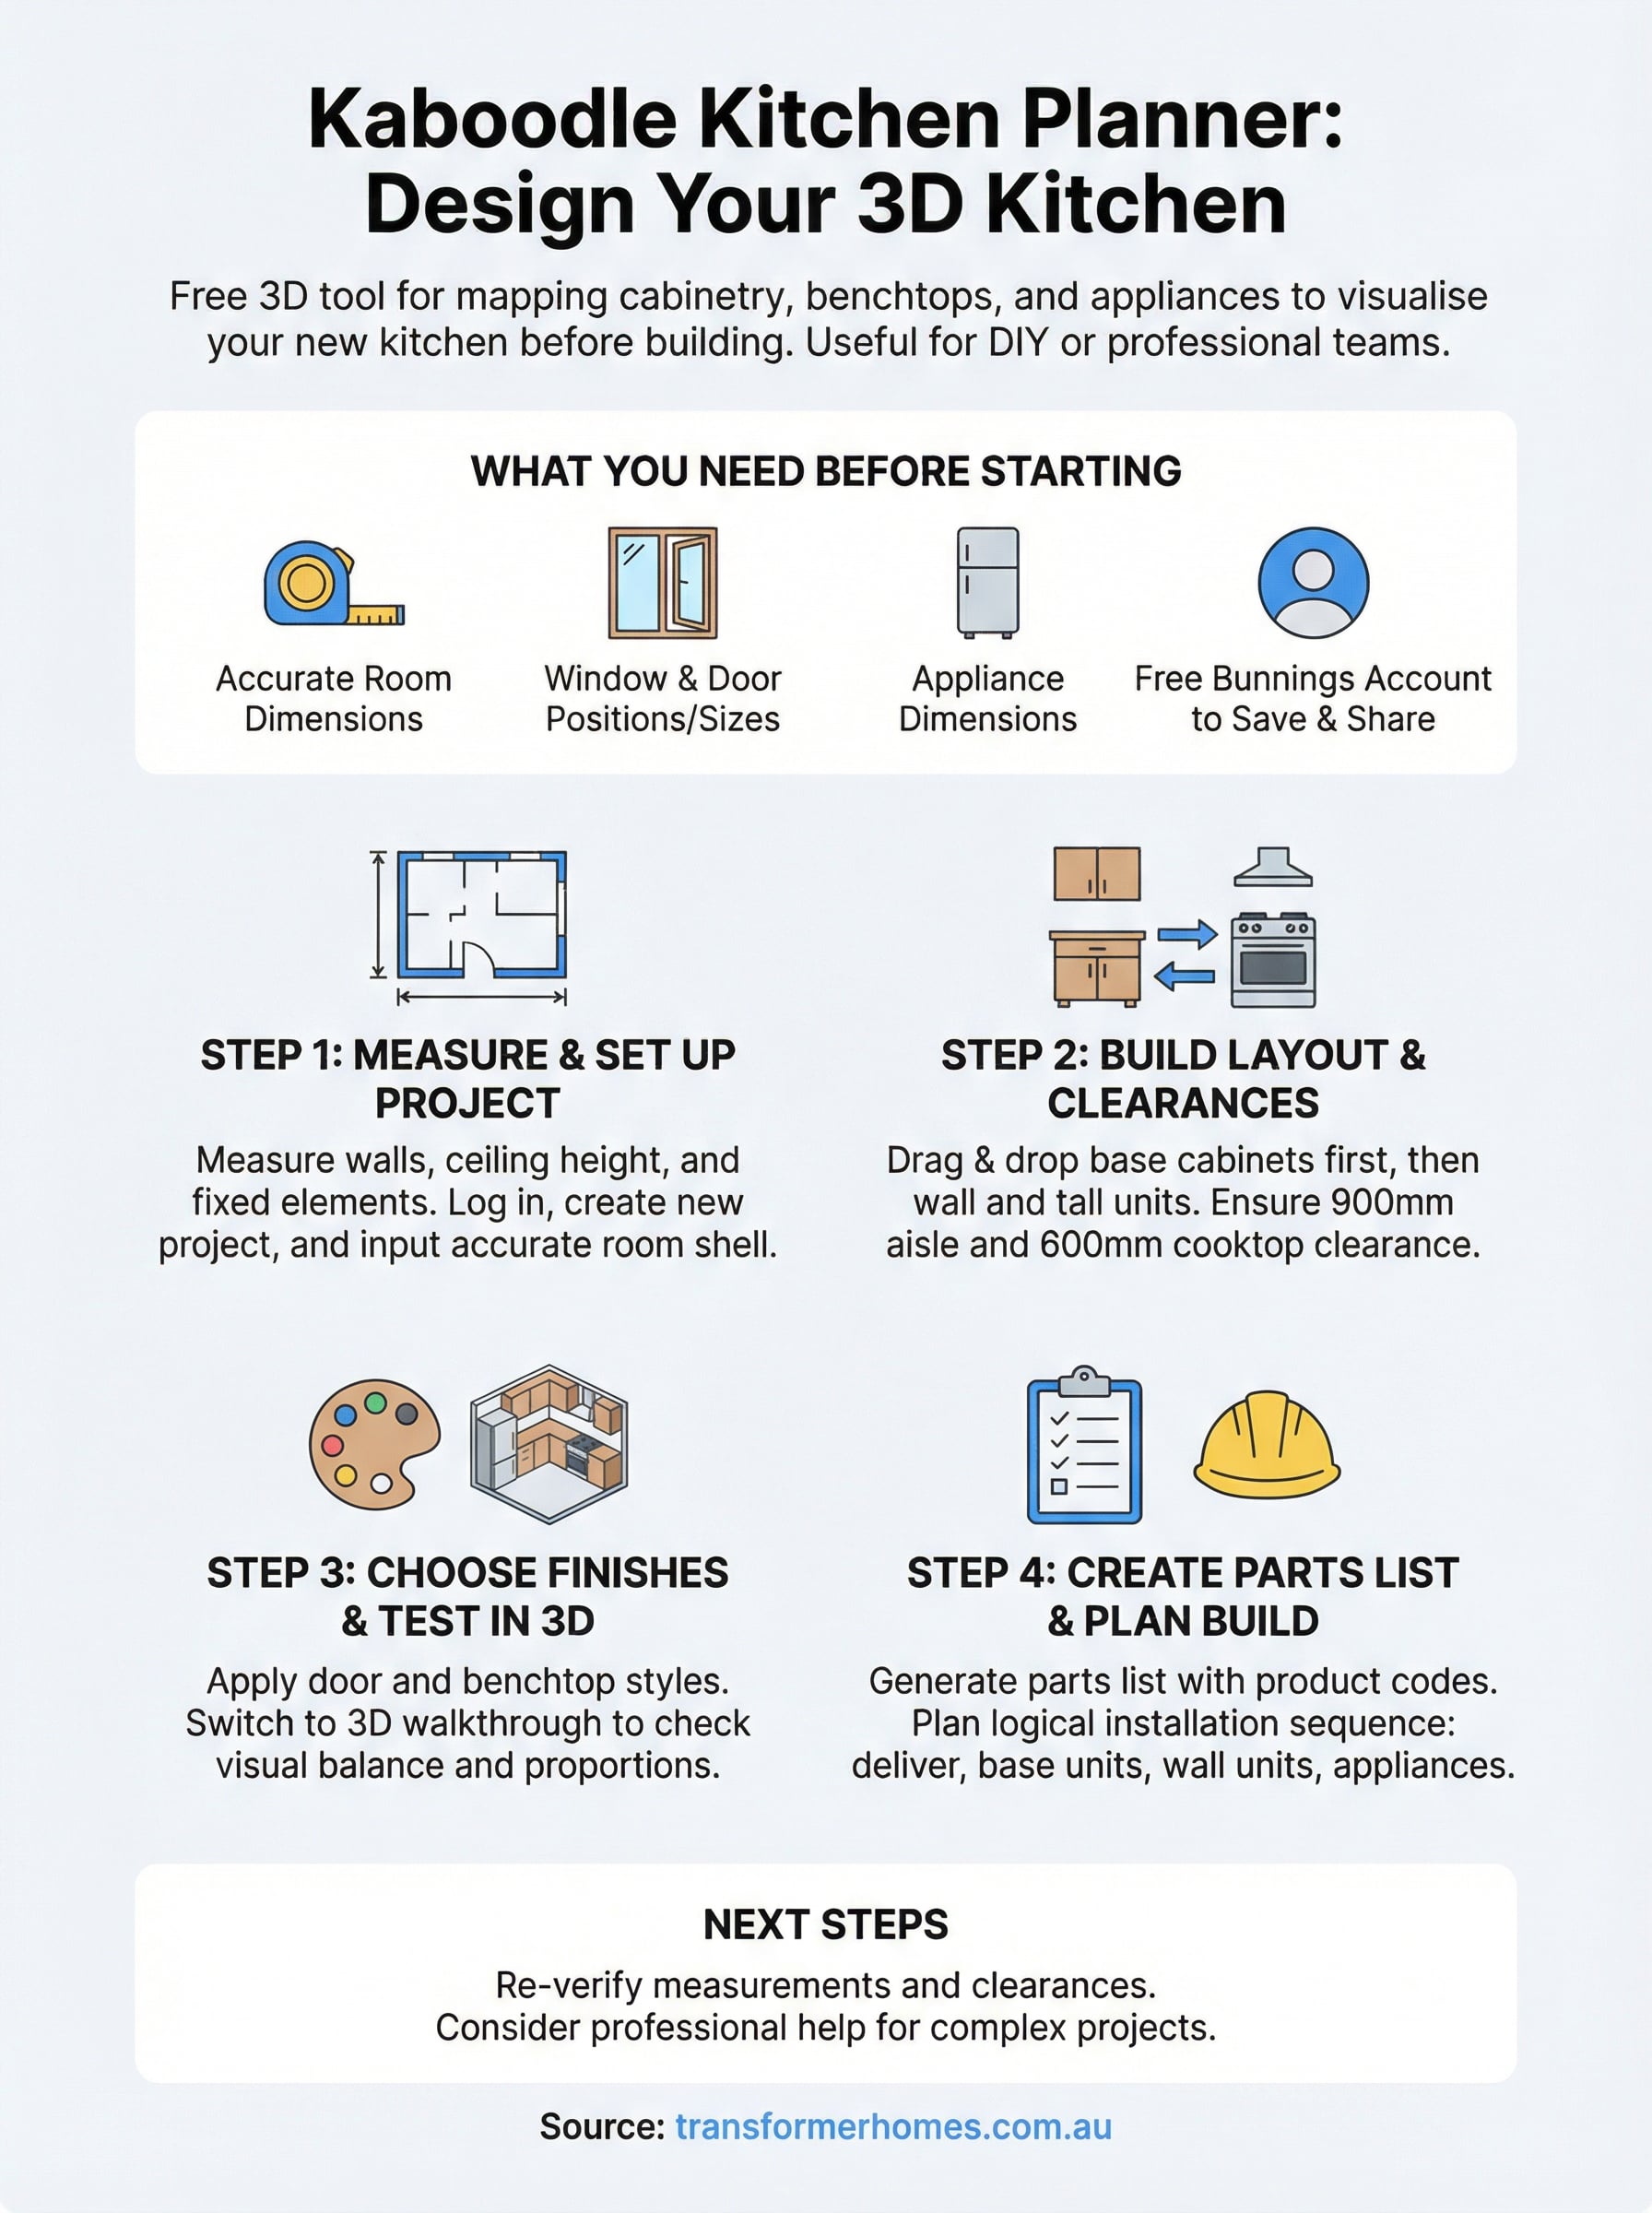
Planning a kitchen renovation starts well before any tradesperson sets foot in your home. The Kaboodle kitchen planner is a free 3D design tool from Bunnings that lets you map out cabinetry, benchtops, and appliance placements from your computer, giving you a realistic visual of your new kitchen before you commit to anything.
At Transformer Homes, we handle kitchen renovations across Melbourne’s northern and western suburbs, and we regularly see clients arrive with Kaboodle designs in hand. It’s a genuinely useful starting point, whether you’re going the DIY route or handing the project over to a professional building team. Having a clear layout from the outset makes quoting more accurate and reduces surprises during construction.
This guide walks you through how the Kaboodle planner works, step by step, from setting up your room dimensions to exporting a final design you can actually build from.
What the Kaboodle kitchen planner does and what you need
The Kaboodle kitchen planner is a browser-based 3D design tool hosted on the Bunnings website. It lets you drag and drop cabinet units, benchtops, and appliances into a custom room shape, then switch to a 3D view to see how the finished kitchen will look. You do not need to download any software to get started, though saving your project requires a free Bunnings account.
What the planner covers
Inside the tool, you can browse the full Kaboodle product range, including base cabinets, wall cabinets, pantry units, benchtops, and doors across a range of finishes and colours. You set your room dimensions, position windows and doors, and experiment with different layouts, including L-shapes, U-shapes, and galley configurations. Once you are happy with the design, the planner generates a parts list with product codes you can take directly to a Bunnings store or use to order online.
The parts list is one of the most useful outputs from the planner, as it removes the guesswork from quoting and ordering materials.
What you need before you start
Before you open the tool, gather a few key details so you can move through the design process without stopping. Having accurate room measurements and confirmed appliance sizes upfront saves significant time.
You also need to identify any fixed elements in your kitchen that cannot move, such as a load-bearing wall, a gas point, or a plumbing stack. These constraints shape your layout options before you place a single cabinet in the planner.
| What you need | Why it matters |
|---|---|
| Room dimensions (length, width, height) | Sets the base room shape in the planner |
| Window and door positions and sizes | Ensures cabinets fit around existing openings |
| Appliance dimensions (oven, fridge, dishwasher) | Reserves the correct clearance in your layout |
| A free Bunnings account | Required to save and share your design |
Step 1. Measure your kitchen and set up a project
Accurate measurements are the foundation of any reliable kitchen design. Before you open the Kaboodle kitchen planner, spend 20 minutes with a tape measure recording every dimension you need. Entering wrong figures early means every cabinet placement after that point is off.
How to measure your kitchen
Measure the full length of each wall at bench height, then record the ceiling height and note where windows, doors, and any fixed services sit along each wall. Write each measurement down on a rough sketch as you go.
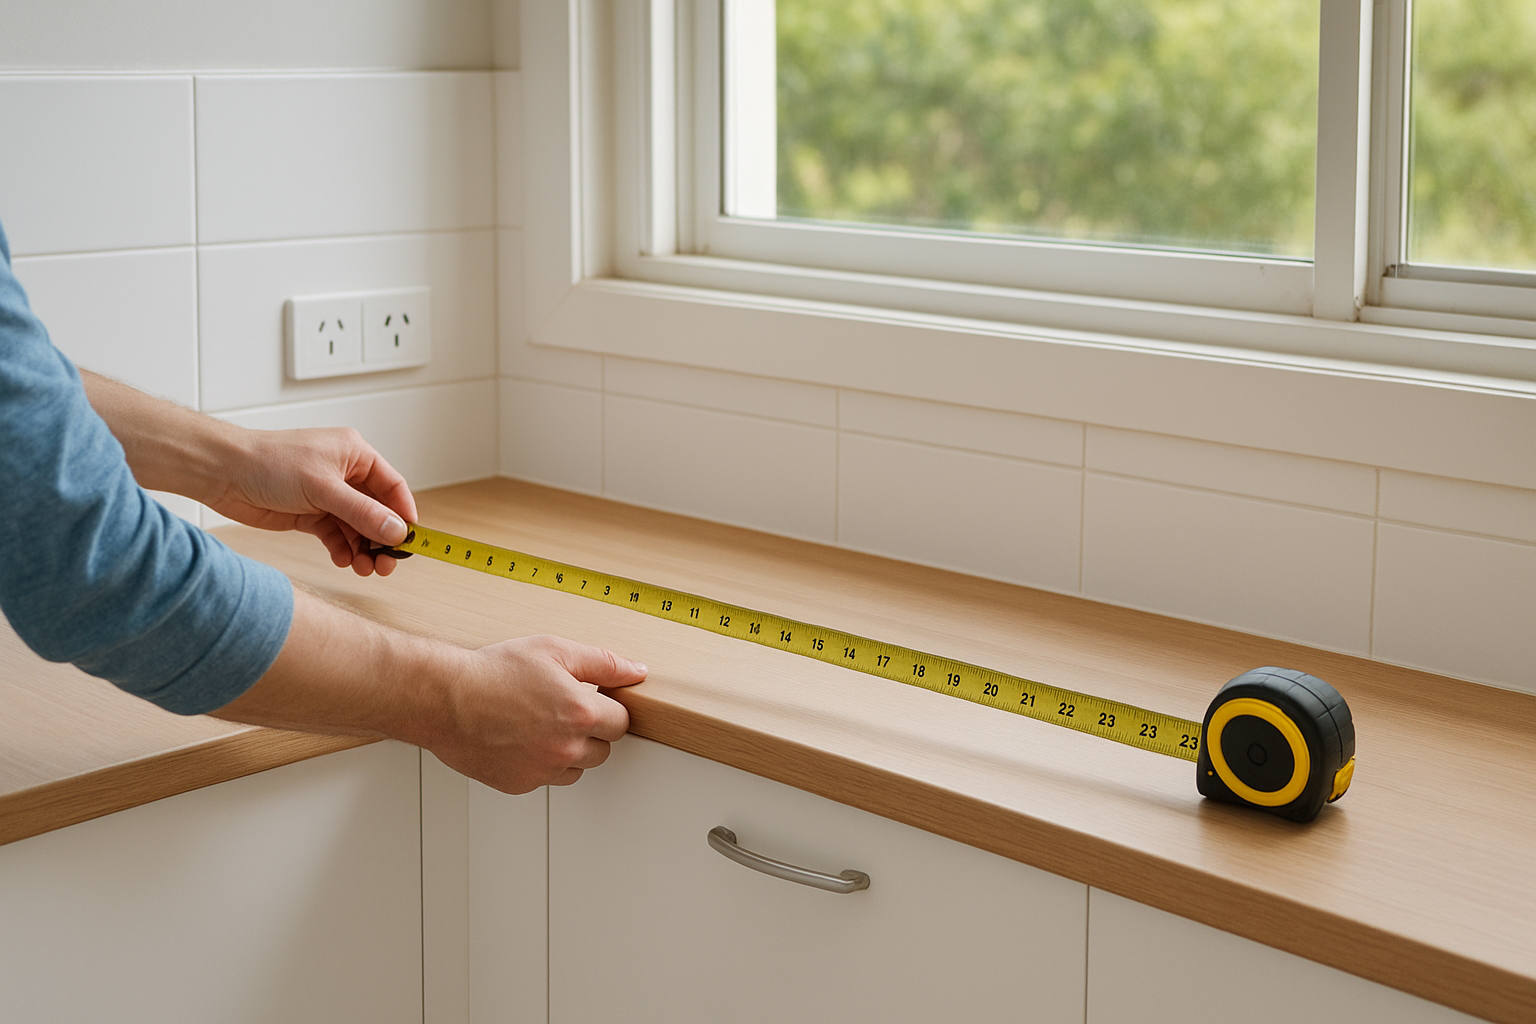
Getting the window and door positions right at this stage prevents you from designing a cabinet run that physically cannot fit your space.
Use this checklist to make sure you have everything before you start:
- Total wall lengths (all four walls)
- Window position from each corner, plus width and height
- Door position from each corner, plus width and swing direction
- Ceiling height
- Location of power outlets, gas points, and plumbing
Setting up your project
Once your measurements are ready, log in to your free Bunnings account and open the planner. Select "New Project," enter your room dimensions, then place windows and doors where they sit on your sketch. You now have an accurate shell to build your layout from.
Step 2. Build the layout with cabinets and clearances
With your room shell set up, you can start placing cabinets. Open the product panel in the Kaboodle kitchen planner and work from the floor up: base cabinets first, then wall cabinets, then any tall pantry units. This order keeps the layout logical and reduces the need to reposition items later.
How to place cabinets
Drag each cabinet unit from the product panel to its position along your walls. The planner snaps units together automatically, so runs of cabinets align without manual adjustment. Start with your longest uninterrupted wall, then work around corners and appliance spaces.
Use this placement order to keep things organised:
- Base cabinets along the longest wall
- Corner units where two runs meet
- Appliance gaps (oven, fridge, dishwasher)
- Wall cabinets above base runs
- Tall pantry or tower units
Clearances to get right
Clearances are where many first-time designs go wrong. You need at least 900mm between facing cabinet runs to allow two people to move past each other, and a minimum 600mm between the cooktop and any overhead cabinet. The planner will show you if units overlap, but it will not automatically flag clearance issues, so check these manually before you finalise anything.
Measure your clearances in the top-down view before switching to 3D, as it is the most accurate perspective for spacing.
Step 3. Choose finishes and test your design in 3D
Once your cabinet layout is in place, you can apply door finishes, benchtop materials, and colour combinations to see how the kitchen will actually look. This step is where the Kaboodle kitchen planner shifts from a technical exercise into something you can genuinely react to and refine.
Selecting door and benchtop finishes
Open the finishes panel and select a door style and colour for your cabinets. Kaboodle offers options including gloss, matte, and textured finishes across neutral and bolder tones. Apply a benchtop material alongside your door choice to see how the two work together before you commit to either.
Testing a light benchtop against a dark door, or vice versa, often reveals combinations that look better in 3D than they did on a flat swatch.
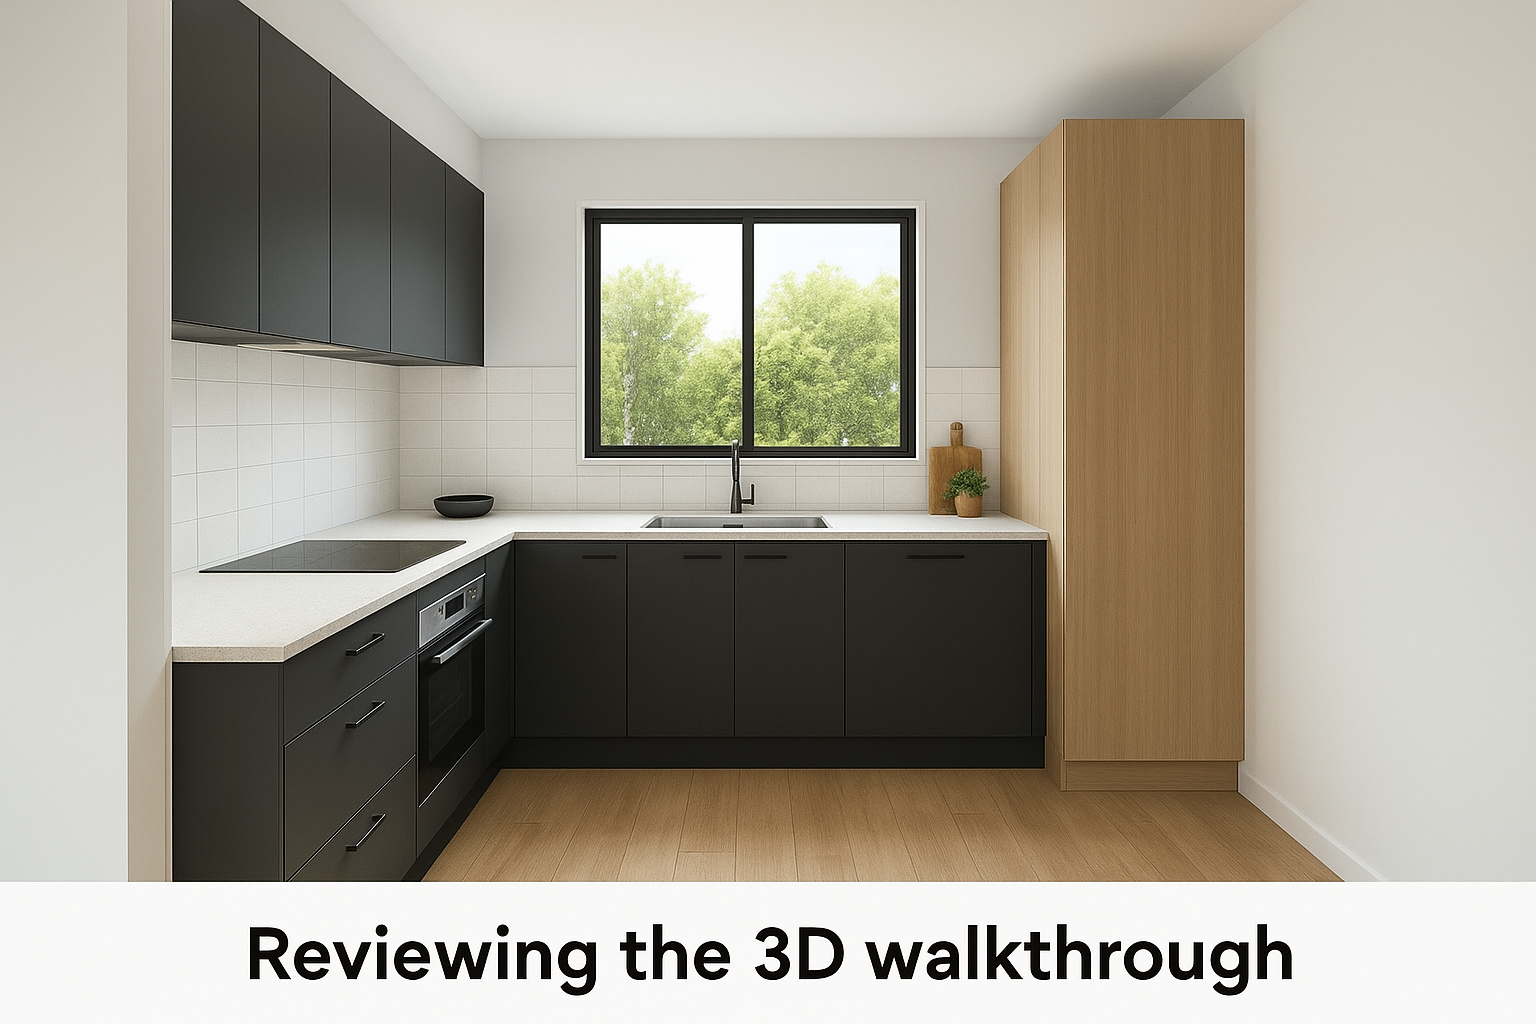
Reviewing the 3D walkthrough
Switch to the 3D view and use the navigation controls to move through the space at eye level. Check that overhead cabinets do not feel visually heavy above the bench, and confirm that taller units sit proportionally against your wall height. If something looks off, return to the layout view, adjust the unit or finish, and re-check in 3D before moving on.
Step 4. Create a parts list and plan the build
Once your design is finalised in the Kaboodle kitchen planner, the tool generates a complete parts list that links every item in your design to a specific product code. This is the step that turns your 3D layout into an actual shopping and construction plan.
Export and review your parts list
Select the export option from the project menu to download your parts list as a PDF. Check each line item against your design by confirming the cabinet dimensions and quantities match what you placed in the layout. Cross-reference door and benchtop items carefully, as these are the lines most likely to need manual review if you made late-stage finish changes.
Print a copy of the parts list and take it to your local Bunnings store so staff can confirm stock availability before you commit to a build date.
Plan the build sequence
Use your parts list to map out a logical installation order: deliver materials first, install base cabinets before wall cabinets, and leave appliance connections until the cabinets are secured. A simple checklist works well here:
- Confirm all items are in stock
- Book delivery or arrange transport
- Schedule trades (plumber, electrician) around cabinet installation
- Set a start date with buffer days for delays
Next steps for your kitchen plan
You now have everything you need to move from a blank room to a complete 3D design with a ready-to-use parts list. The Kaboodle kitchen planner gives you a solid foundation, whether you plan to install the cabinets yourself or hand the design to a professional to quote against.
Before you finalise anything, walk back through your measurements one more time and confirm that your clearances and appliance gaps match the actual products you intend to buy. Small discrepancies at this stage are far cheaper to fix on screen than on site.
If your renovation involves structural changes, a new layout configuration, or work that goes beyond cabinet installation, a qualified builder can take your Kaboodle design and turn it into a fully managed construction project. The team at Transformer Homes works with homeowners across Melbourne’s northern and western suburbs and can help you move your kitchen plan into a finished result.
