That narrow strip of space running along the side of your home, between the exterior wall and the boundary fence, is one of the most underused areas in Melbourne’s older housing stock. For owners of Victorian terraces, Edwardian cottages, and post-war homes on tight blocks, side return extension ideas can unlock serious square footage without eating into your backyard. It’s a move that adds both living space and natural light where homes need it most.
But not every side return extension is created equal. The design you choose affects everything from your kitchen layout to how deep sunlight reaches into the middle of your home. Get it right and you transform a dark, cramped floor plan into something that actually works for how you live. Get it wrong and you’ve spent good money on a corridor.
At Transformer Homes, we build and renovate across Melbourne’s northern and western suburbs, areas full of exactly these kinds of narrow-block homes. We’ve put together seven practical side return extension ideas to help you figure out what’s possible on your property, covering layouts, materials, and the design details that make the biggest difference. Whether you’re in the early planning stages or ready to brief a builder, this guide gives you a strong starting point.
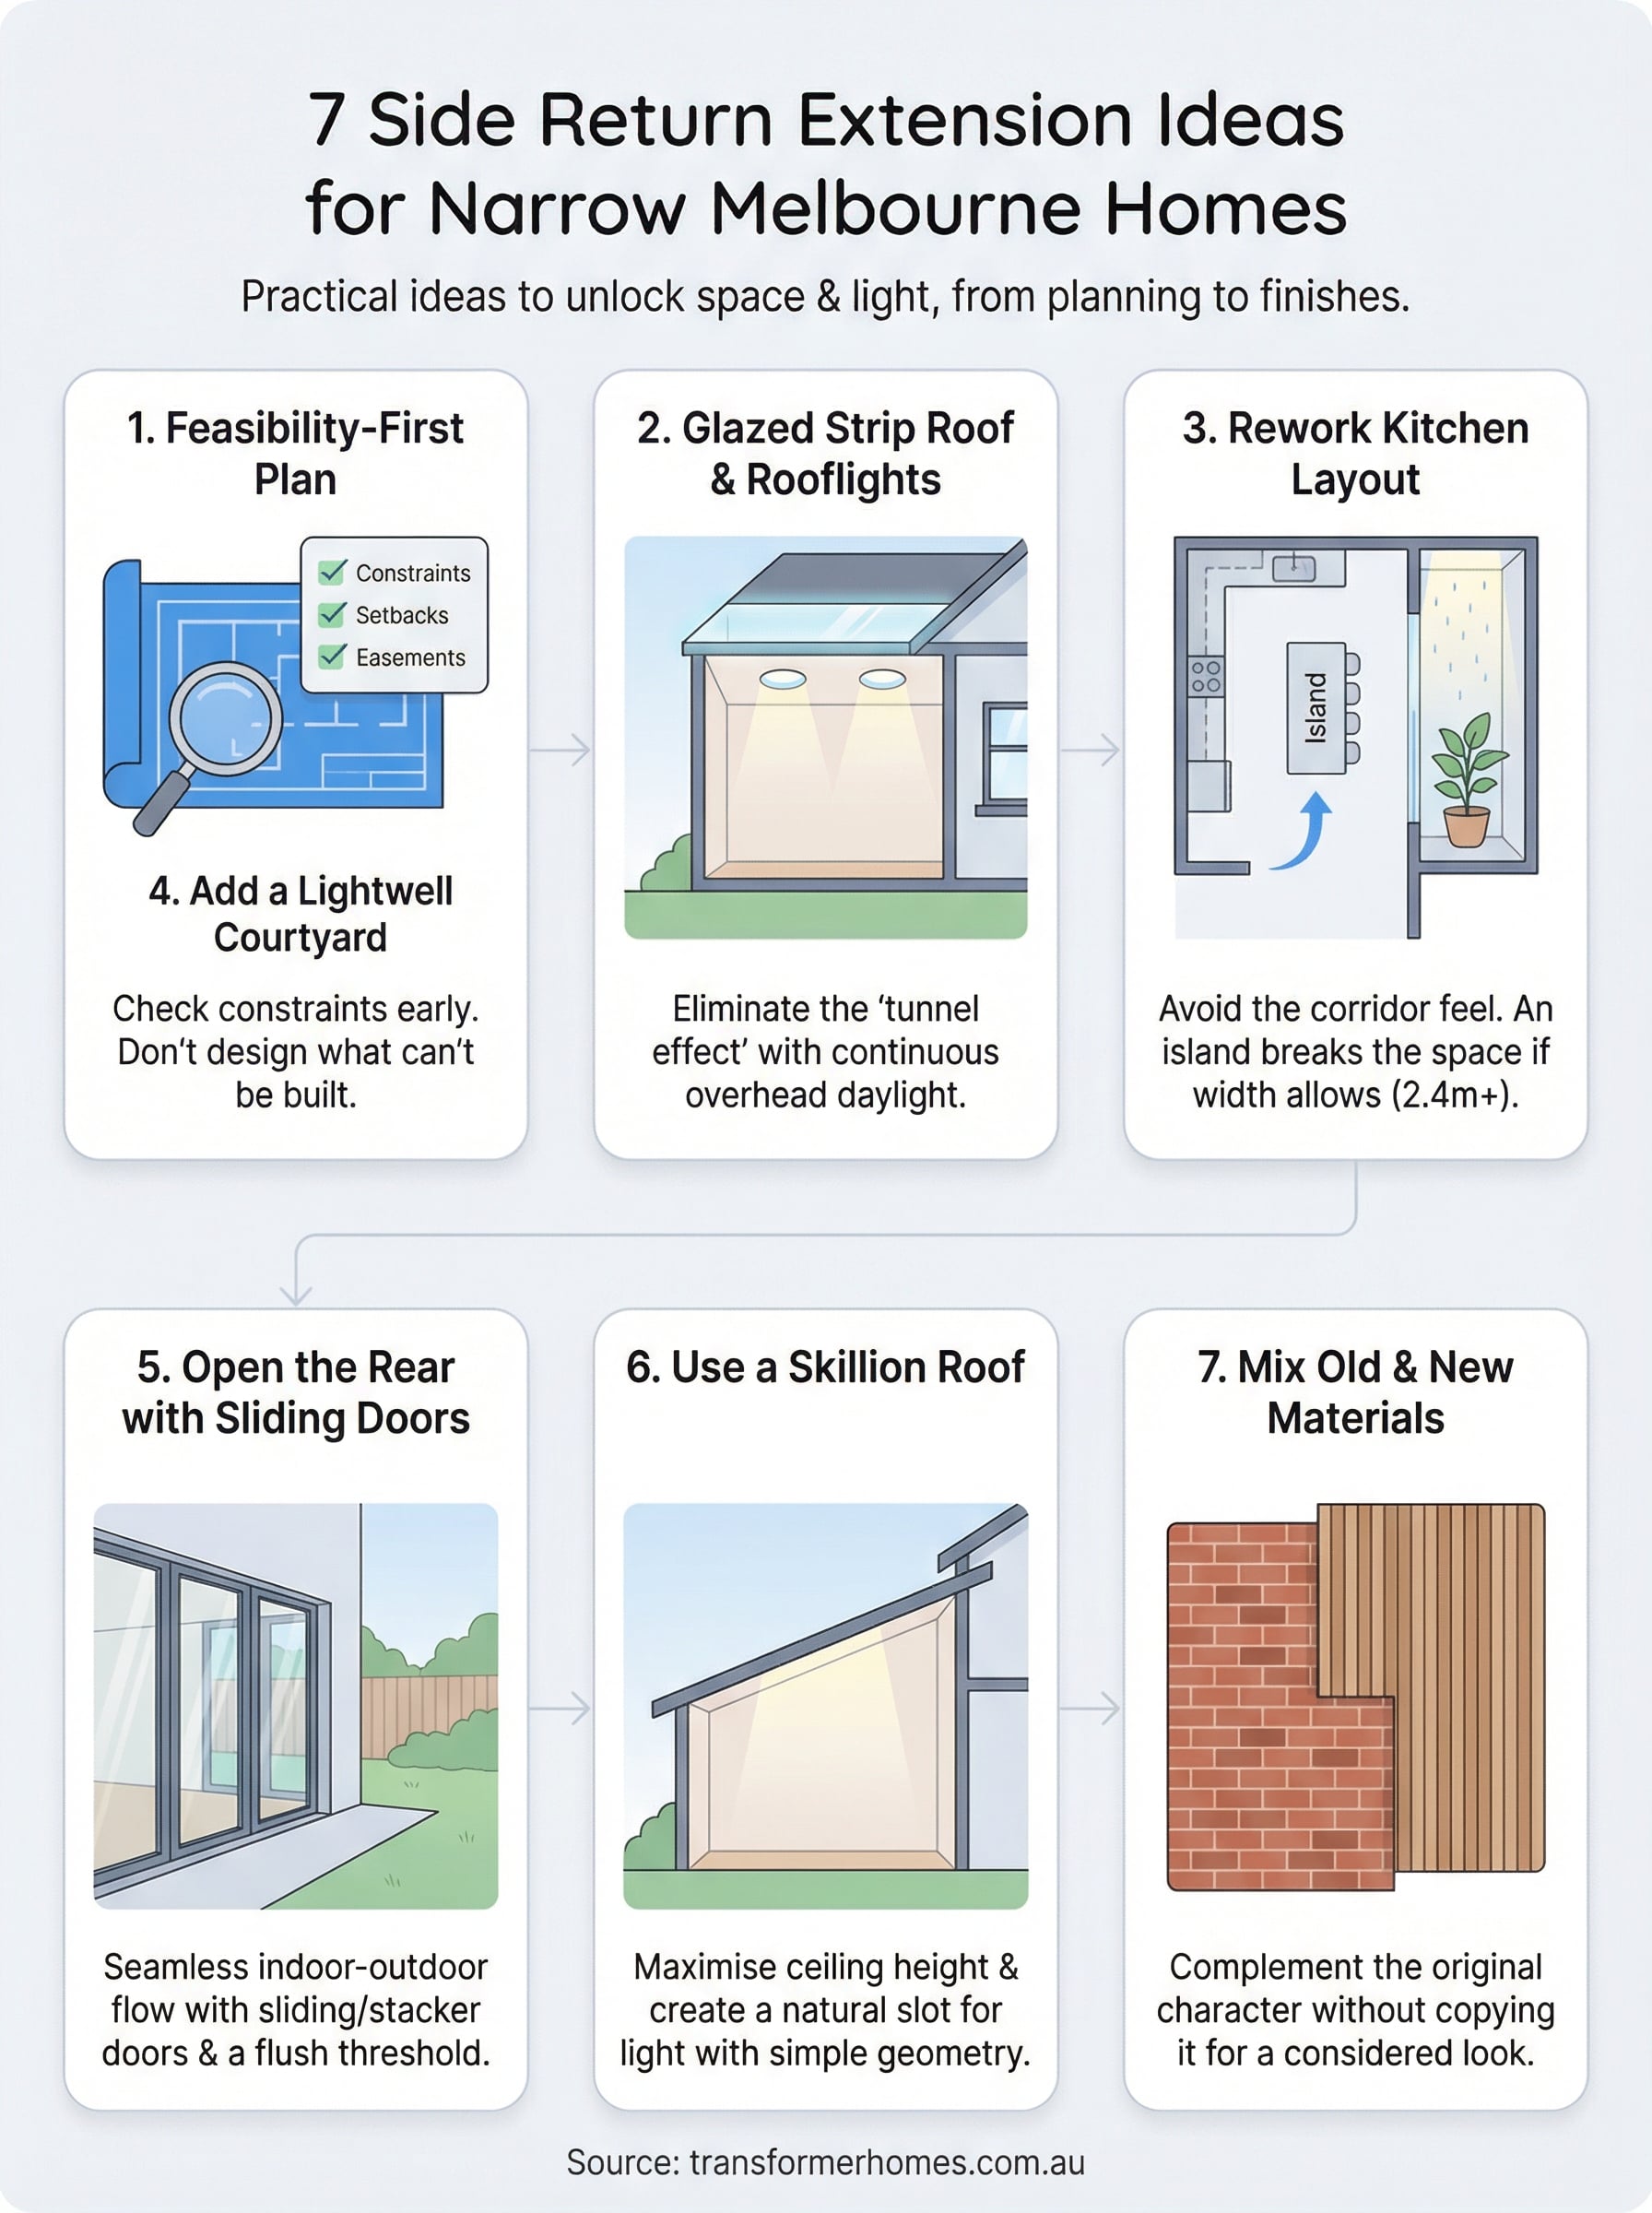
1. Start with a feasibility-first design and build plan
Before you spend anything on design or materials, the most useful first step is confirming whether your side return extension is actually buildable on your block. Melbourne’s narrow-block homes vary significantly in their setbacks, easements, and planning overlays, so checking constraints early prevents you from designing something that cannot be approved or built within your budget.
What this idea is and why it suits Melbourne narrow blocks
A feasibility-first approach means assessing your site conditions, planning controls, and structural constraints before briefing a designer on aesthetics. For homes in Melbourne’s northern and western suburbs, particularly Victorian and Edwardian terraces in Northcote, Preston, and Thornbury, the side return is often just 900mm to 1.5m wide. That gap alone will not create a liveable room, but combined with a rear extension or internal reconfiguration, it can transform your entire ground floor into a layout that actually works for daily life.
Getting feasibility right at the start saves you from designing an extension your council will not approve.
Key checks before you lock in a layout
Several site-specific factors will shape what is possible on your block. Boundary setback requirements under Victoria’s ResCode provisions set minimum distances from side and rear boundaries, and these are non-negotiable. You also need to check for easements running along the side return, which are common in Melbourne’s older suburbs and can restrict how close you build to the boundary or whether you can build over that strip entirely.
Run through these checks before finalising any layout:
- Confirm the width of your side return and total footprint available
- Check your property’s zoning and any overlays (Heritage, Neighbourhood Character, Vegetation)
- Identify any easements recorded on your title
- Review ResCode setback and overlooking requirements
- Assess the structural condition of the existing side wall
Costs, timeframes, and approval notes in Melbourne
Side return extensions in Melbourne typically cost between $3,500 and $5,000 per square metre, depending on structural complexity, finishes, and site access constraints. For a modest 15 to 20sqm project, expect a total build cost in the range of $80,000 to $150,000 including design fees, approvals, and construction. Planning permit timeframes vary by council but generally run six to twelve weeks for straightforward single-dwelling applications, with building permits issued separately after planning approval is granted. If your property falls within a Heritage Overlay, flag this with your builder before committing to any external materials or roofline changes.
2. Bring daylight in with a glazed strip roof and rooflights
One of the most common problems with side return extensions is that the new space sits between two walls, cutting off the natural light that would otherwise enter from the side. A glazed strip roof, combined with strategically placed rooflights, solves this directly and is one of the most impactful side return extension ideas you can apply to a narrow Melbourne home.
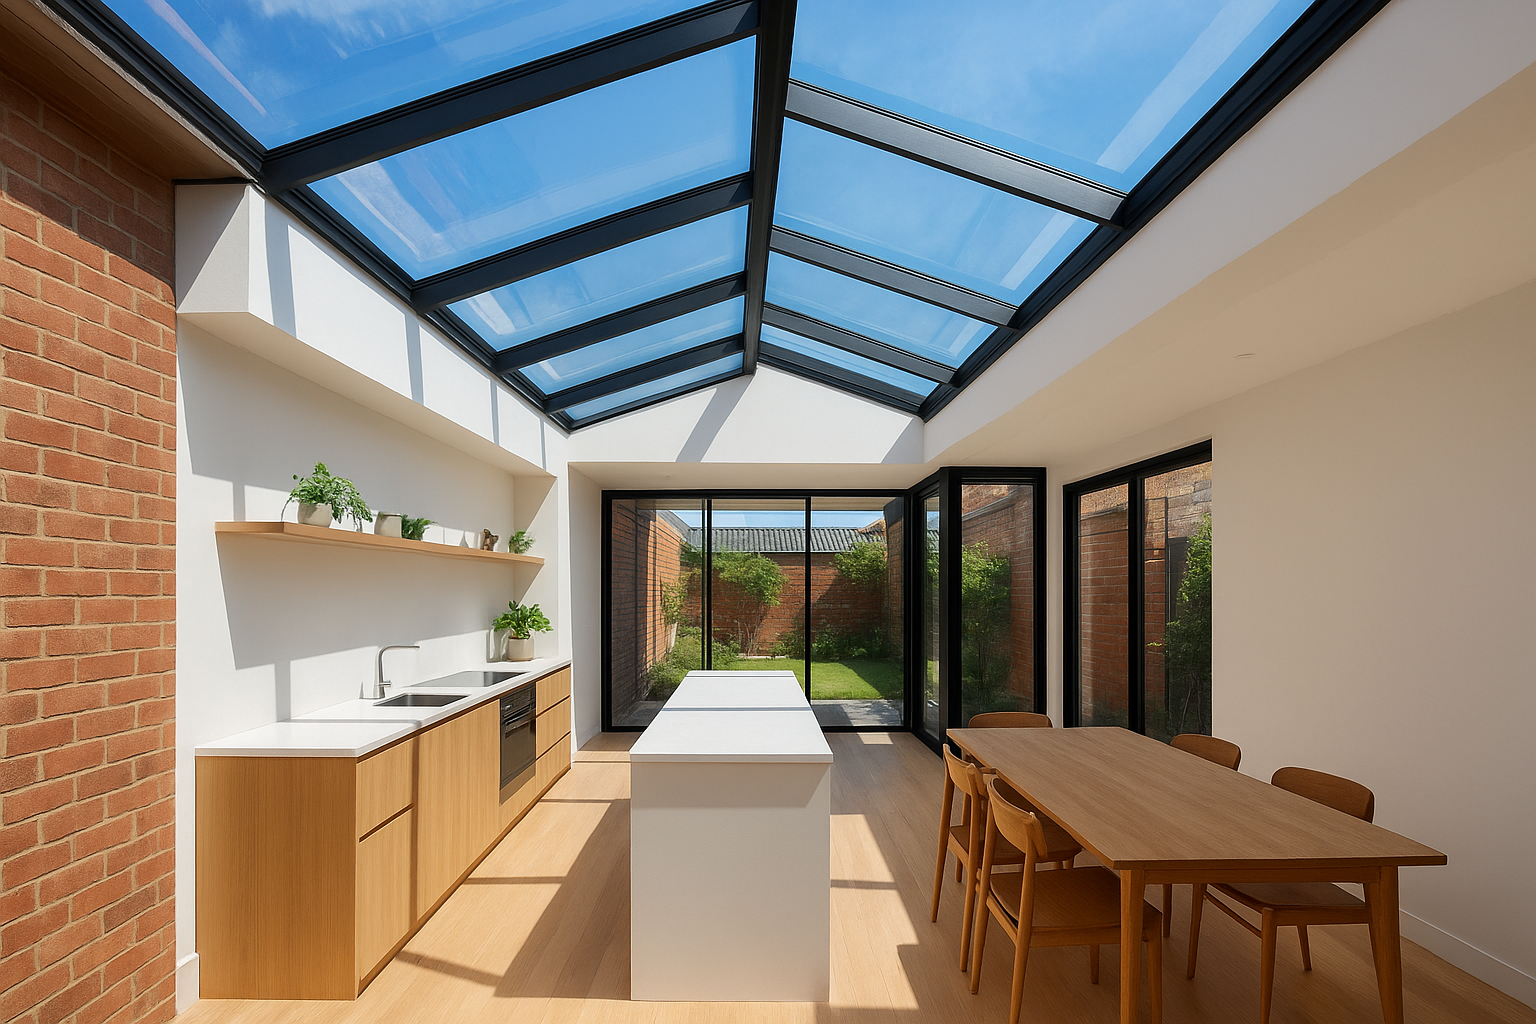
What this idea is and how it changes the feel of the home
A glazed strip roof runs along the junction between the existing rear wall of your home and the new extension roof, creating a continuous band of overhead glazing that pulls light deep into the floor plan. Rooflights, positioned further along the extension roof, add secondary light sources above the main living or kitchen area. Together, they eliminate the tunnel effect that a fully solid roof would create in a side return.
A well-placed rooflight can reach parts of your floor plan that no window on a side wall ever could.
Design choices that avoid overheating and glare
Glazing on a roof collects more solar heat than a vertical window, so specifying the right glass is critical. Low-emissivity double glazing with a solar control coating keeps heat gain manageable in Melbourne’s warmer months. Your designer should also consider roof pitch and orientation when sizing the glazed area, as a north-facing rooflight will perform very differently to a south-facing one.
Costs, timeframes, and approval notes in Melbourne
Glazed roof elements add roughly $800 to $1,500 per square metre to your extension cost compared to a standard insulated roof. Most side return projects incorporating rooflights sit within the same six to twelve week planning permit window, though heritage overlays may restrict the type and size of glazing visible from the street.
3. Rework the kitchen layout so it does not become a corridor
Extending into the side return gives you extra floor area, but the shape of that space is inherently long and narrow. Without careful planning, your new kitchen ends up feeling like a passageway rather than a room worth spending time in. Rethinking the kitchen layout is one of the most practical side return extension ideas you can act on during the design phase.
What this idea is and the layouts that work in tight widths
A galley-style run of cabinetry along one or both walls is the most common response to a narrow side return, but a single-wall layout with an island often performs better when width allows. If your extended footprint reaches 2.4m or wider, an island placed centrally breaks the corridor feel and creates a second workzone without blocking movement.
The kitchen layout you choose now will determine how well the space works for the next twenty years.
Where to place storage, seating, and circulation routes
Position tall storage units and appliances at the closed end of the extension, away from where the space opens into the main living area. This keeps the transition between rooms feeling open and draws your eye toward the rear garden rather than toward a bank of cupboards. Seating, whether bar stools at an island or a built-in bench, works best where natural light from rooflights falls, which is typically toward the middle of the run.
Costs, timeframes, and approval notes in Melbourne
Kitchen fitout within a side return extension typically adds $25,000 to $60,000 on top of the base build cost, depending on joinery quality and appliance selections. Internal layout changes do not usually affect your planning permit, but any structural alterations to the existing rear wall need to be captured in your building permit documentation.
4. Add a lightwell courtyard to protect privacy and light
A lightwell courtyard is a small, open-to-sky void cut into the footprint of your extension, positioned between the new build and your boundary. Rather than running glazing all the way to the fence line, you leave a deliberate gap that brings vertical daylight directly into the middle of your floor plan while also giving you a pocket of outdoor space.
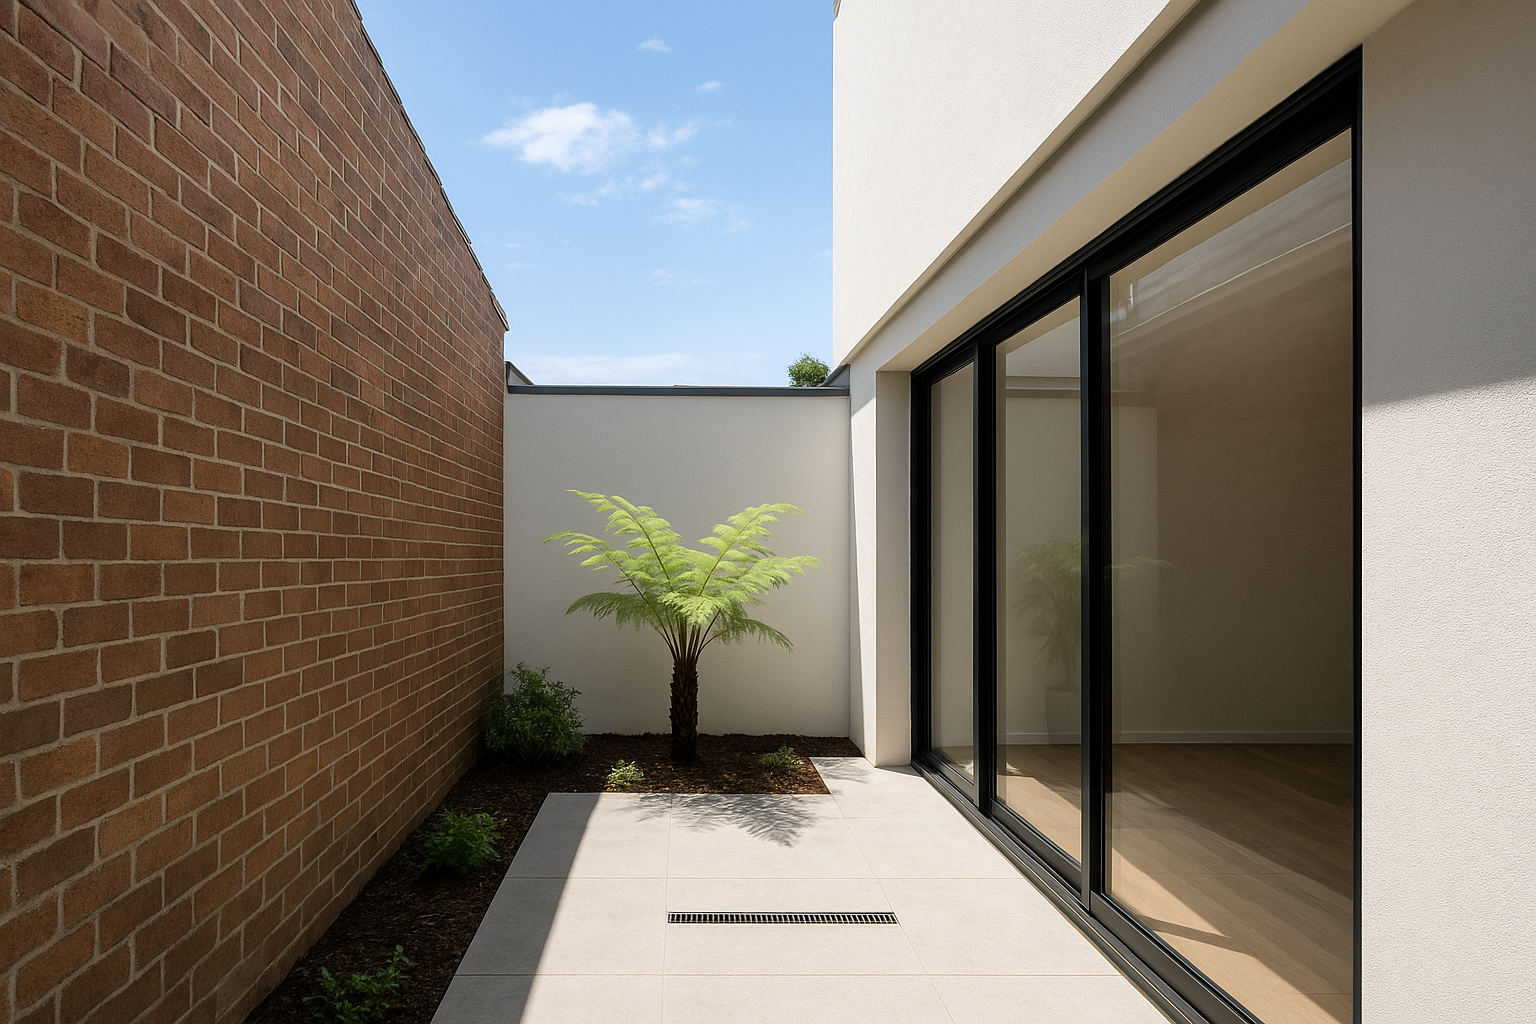
What this idea is and when a lightwell beats full glazing
Full-length glazing along a side wall can feel exposed when neighbours look down from a two-storey home next door. A lightwell solves this by pulling light from above rather than from the side, which removes the sightline issue entirely. Among all the side return extension ideas suited to Melbourne’s tighter blocks, this one works best when your boundary is shared with a higher dwelling or when heritage controls limit how much new glazing can face the street or a shared wall.
A lightwell gives you natural light and private outdoor space without compromising your relationship with the boundary.
Privacy, overlooking, drainage, and planting considerations
You need to slope the courtyard floor toward a central drain connected to your stormwater system, and your builder should confirm council drainage requirements before construction starts. Planting a small tree fern or compact shrub in the lightwell softens the walls visually and reduces reflected heat in summer. Keep the courtyard width at a minimum of 1.2m so air can circulate and maintenance stays practical.
Costs, timeframes, and approval notes in Melbourne
A lightwell courtyard typically adds $8,000 to $15,000 to your extension budget, covering the structural framing, drainage, and any planted base. Planning permit timeframes remain in the six to twelve week range, though your engineer will need to detail the courtyard walls carefully if they sit close to the boundary.
5. Open the rear with sliding or stacker doors and a flush threshold
A side return extension pushes your living area closer to the rear garden, and how you treat that rear boundary determines how much you actually use both spaces. Sliding or stacker doors fitted with a flush threshold remove the visual and physical barrier at the rear wall, making the garden feel like a natural continuation of the room rather than a separate area you step down into.
What this idea is and how it improves indoor-outdoor flow
Sliding doors run on a floor track and stack neatly to one side, while stacker doors fold into a compact panel that clears the full opening width when open. Both work well as side return extension ideas for homes where the rear wall is your only wide glazed elevation. A flush threshold, where the internal floor and external paving sit at the same level, removes the step that would otherwise break the connection between inside and outside.
The rear opening is where your living space and garden either connect properly or stay divided.
Structural steel, weatherproofing, and drainage details to get right
Removing the rear wall typically requires a structural steel beam to carry the load above the new opening, sized by your engineer based on the span and what sits above. Weatherproofing matters here: a recessed drainage channel positioned just inside the threshold catches wind-driven rain and routes it away from your floor structure before it causes damage.
Costs, timeframes, and approval notes in Melbourne
Sliding or stacker door systems cost between $8,000 and $20,000 depending on panel count, glazing specification, and frame material. Structural steelwork adds a further $3,000 to $8,000 to that figure. These works fall under your building permit rather than a planning permit, so they do not add to your council approval timeframe.
6. Roof and finishes that suit narrow blocks
The roofline and external materials you choose for a side return extension affect how the new build reads from the street, how much internal height you gain, and whether the addition looks considered or poorly resolved. Two of the most practical side return extension ideas to address narrow blocks together are the skillion roof and the mixed-material finish.
Idea 6: Use a skillion roof to lift ceiling height and light
A skillion roof pitches in a single direction, rising from the boundary fence line toward the existing rear wall of your home. This simple geometry maximises internal ceiling height at the point where old meets new, avoiding the compressed feel that a flat or lowered roof creates. Positioning the high edge at the junction with your existing wall also creates a natural slot for a glazed strip, reinforcing the daylight strategy from idea 2.
A skillion roof is one of the most cost-effective ways to lift both height and natural light in a narrow addition.
Idea 7: Mix old and new materials without losing character
Matching your extension materials exactly to the original fabric rarely produces a convincing result. Instead, use complementary materials that reference the original without copying it. Brick returns, timber battens, or render in a tone drawn from your existing palette keep the addition grounded in the street’s character without pretending the new work is old.
Costs, timeframes, and approval notes in Melbourne
Skillion roofs carry little to no cost premium over a flat roof when comparing equivalent build quality. Mixed-material finishes vary based on cladding choice, but budget an additional $5,000 to $15,000 if you are incorporating feature cladding such as timber or custom brickwork. Heritage overlays may require council sign-off on external materials before your planning permit is issued.
Your next step
These seven side return extension ideas cover the most important decisions you will face, from confirming your block’s constraints to choosing a roofline that actually adds ceiling height. The detail you put into each of these choices during the planning stage directly determines how well your finished extension works for daily life, and how smoothly the build runs from approval through to handover.
Every narrow block in Melbourne presents its own combination of setbacks, overlays, and structural conditions, so generic advice only takes you so far. The next practical step is to sit down with a builder who knows the northern and western suburbs, understands the local planning requirements, and can tell you what is genuinely achievable on your specific site.
If you are ready to talk through your project, get in touch with Transformer Homes and we will help you work out what your side return can realistically deliver.
